
Are you tired of grabbing a snack that promises energy but delivers chalky disappointment later? Oh, I hear you! When I was deep in the marketing world, my diet basically relied on whatever I could stuff in my purse, and frankly, most store-bought protein bars tasted like sweetened cardboard. That struggle is exactly what pushed me back into my grandmother’s kitchen philosophy: great food doesn’t need to be complicated. That’s why I’m thrilled to share the solution that changed my snack game: my super simple, five-ingredient, no-bake peanut butter and chocolate protein bars. These are the homemade protein bars that actually taste like a treat! As I learned from my time building strategies in the corporate world—and what I share over at the Bring Dish philosophy—the best things in life are honest and straightforward. Trust me, these quick protein snacks are about to become your new favorite thing.
- Why These Are the Best Homemade Protein Bars You Will Ever Make
- The 5 Essential Ingredients for Perfect No Bake Protein Bars
- Step-by-Step Guide to Making Easy Protein Bars
- Ingredient Notes and Customizing Your High Protein Snacks
- Tips for Success When Making Protein Bars
- Storage and Make Ahead Protein Bars Strategy
- Frequently Asked Questions About Protein Bars
- Estimated Nutritional Profile for These Protein Bars
- Share Your Homemade Protein Bars Creations
Why These Are the Best Homemade Protein Bars You Will Ever Make
I promise you, these best homemade protein bars are different. When I was trying to eat better during my chaotic marketing days, I failed so many times trying to make my own bars. They always ended up hard, dusty, or just flavorless. That’s why I built this recipe around pure, satisfying results that fit into real life. You need snacks that keep up with you, not the other way around!
- They deliver serious protein without any fuss.
- They are genuinely delicious—no chalk allowed!
- They are perfect for tossing into your gym bag or work briefcase for a much-needed energy boost.
Quick Prep for Your Busy Schedule
This is what I love most. We are talking 10 minutes of active time—that’s it! Since these are no cooking required snacks, there’s no waiting for an oven to preheat or worrying about burning anything. You mix, press, and chill. These are the definition of quick protein snacks when you’re juggling a busy household or running between meetings. We rely on these for easy meal prep bars every Sunday night.
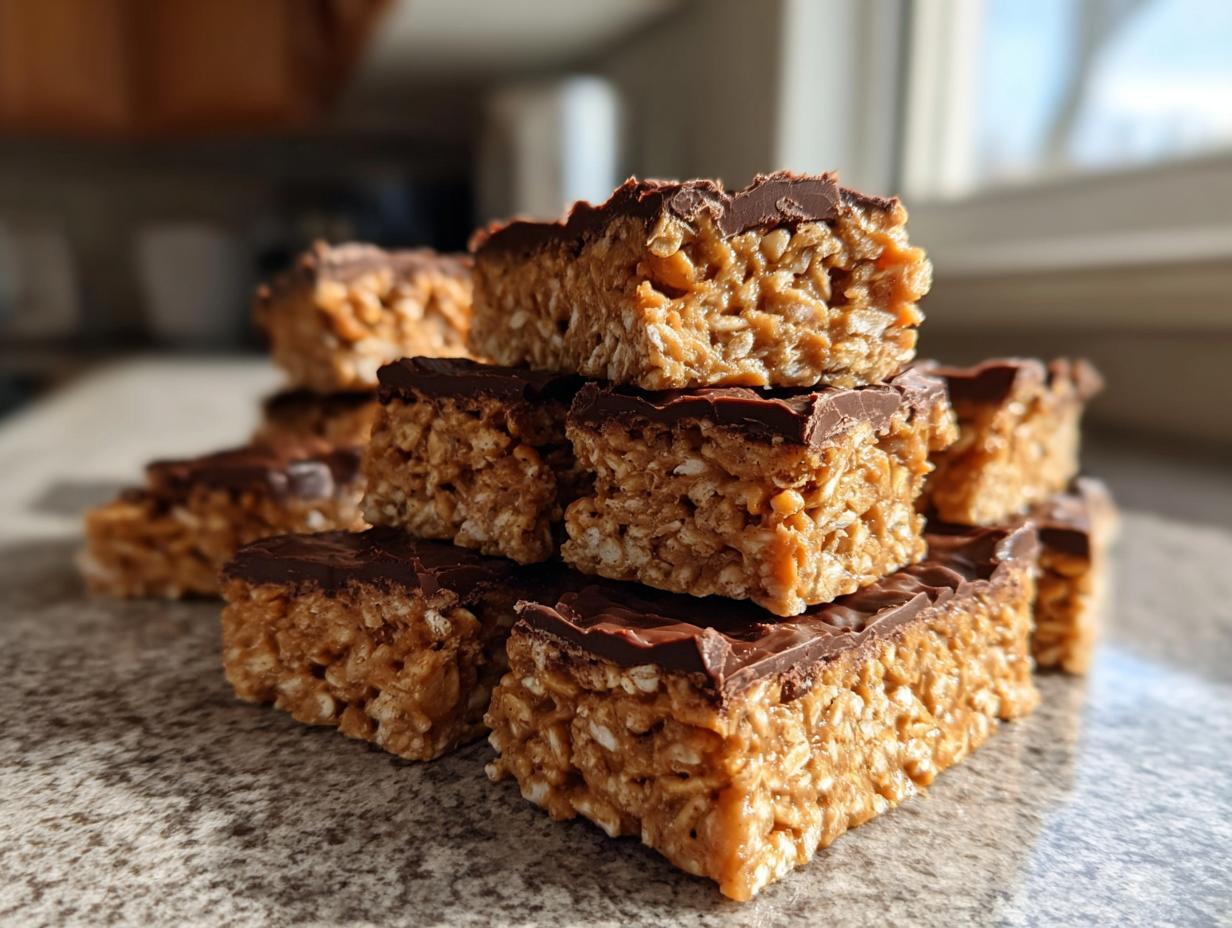
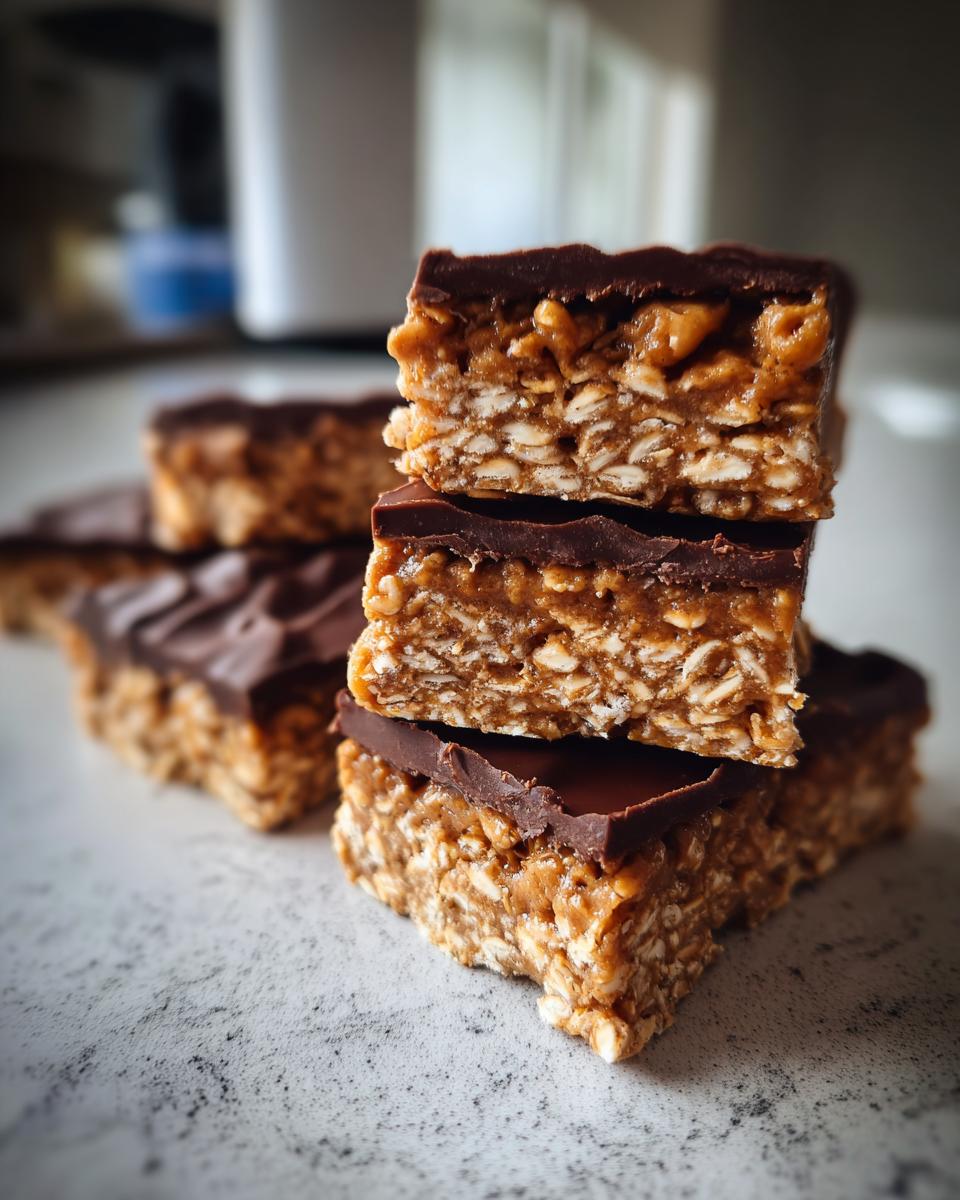
Texture That Beats Store-Bought Protein Bars
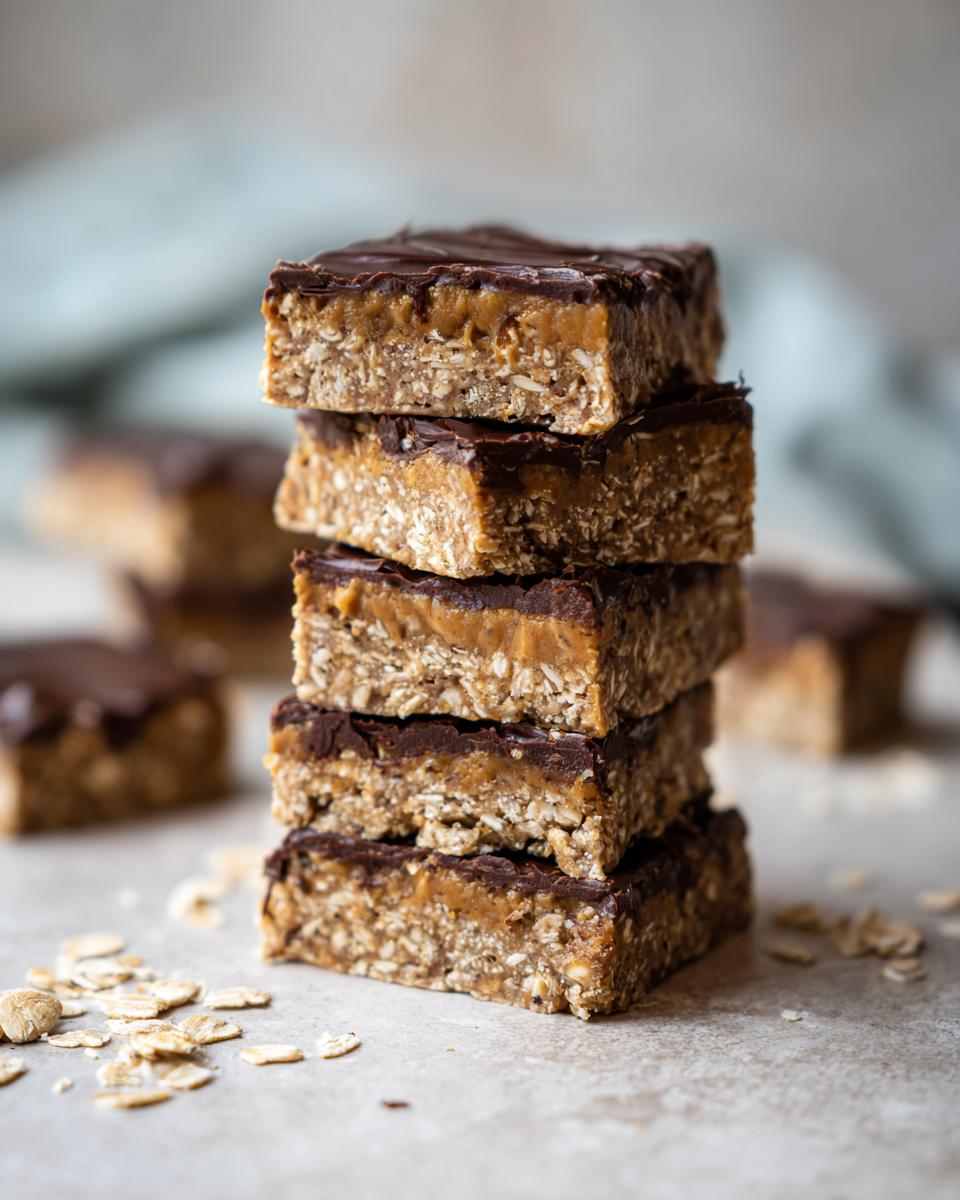
If protein powder makes you think of something dry and crumbly, forget that immediately. The combination of natural peanut butter and honey acts like the best glue on earth. It locks in moisture and gives you these incredibly soft, chewy protein bars. I used to buy those expensive bars that felt like chewing on a brick, but this recipe guarantees a satisfying squish every single time. The texture is everything when you want a truly satisfying high protein snack.
The 5 Essential Ingredients for Perfect No Bake Protein Bars
To create the best homemade protein bars—ones that stay chewy and hold together, not crumble the second you unwrap them—you need to treat your ingredients like the essential building blocks they are. This recipe is beautiful because it relies on just five core items. We aren’t masking weak flavors with tons of sugar or weird additives here; we’re using quality binders to make amazing peanut butter protein bars.
Ingredient Breakdown and Clarity for Your Protein Bars
Let’s look closely at what goes into the bowl because substitution success highly depends on understanding function. For the protein powder, you absolutely need something dense. I usually grab a whey or a casein blend because they absorb liquids better, which is vital for structure, unlike some airier plant powders. You need one full cup of that goodness.
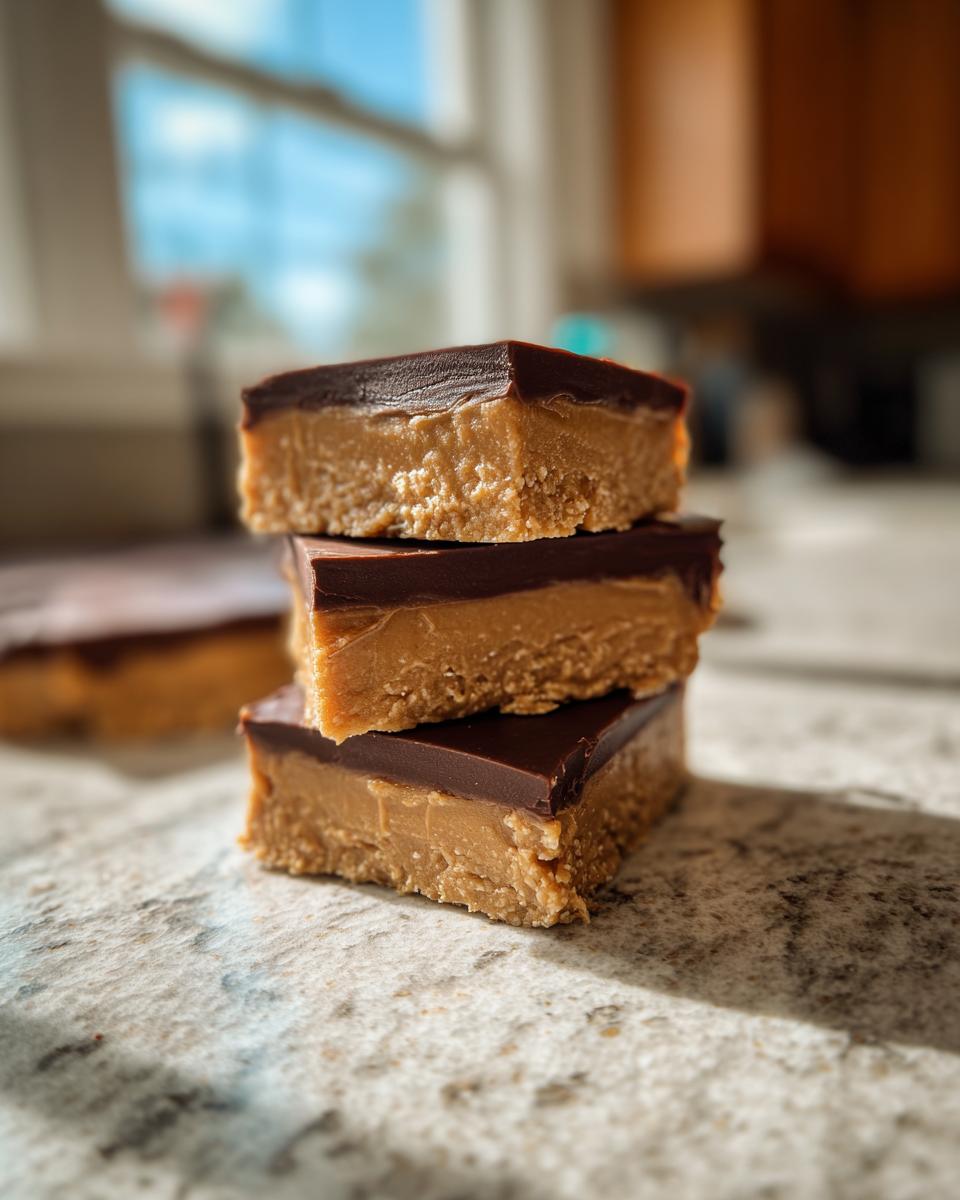
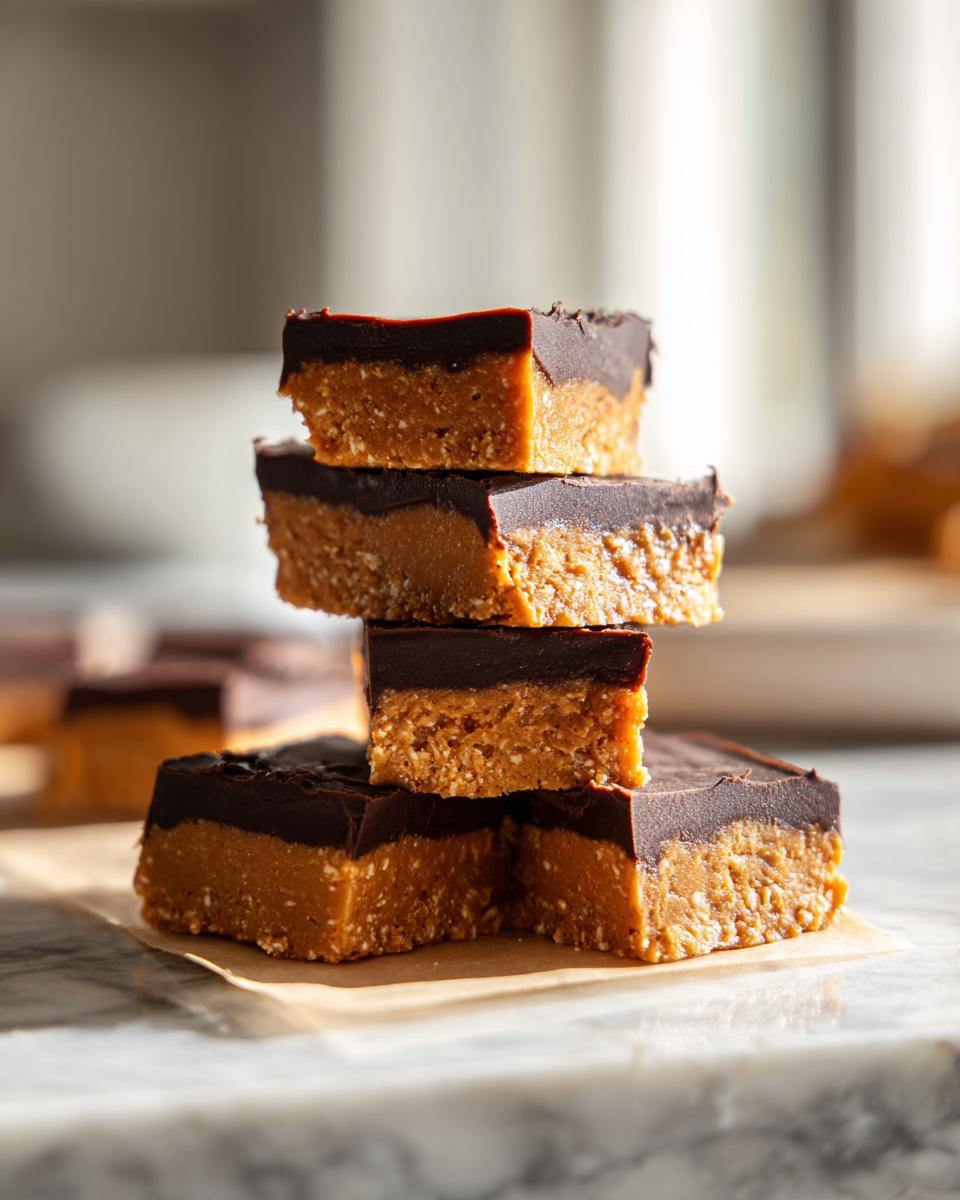
Next up, the fillers matter. We use 1/2 cup of rolled oats—they give us that satisfying chew. Then come our binders: 1/2 cup of natural peanut butter, which is non-negotiable for this flavor profile, and 1/4 cup of honey or maple syrup. The syrup is so important; it’s not just for sweetness, it’s the sticky agent that holds everything together when chilled. Finally, if you want a little treat on top, 1/4 cup of dark chocolate chips seals the deal!
Step-by-Step Guide to Making Easy Protein Bars
Okay, this is where the magic happens, and honestly, it’s almost insultingly easy. Since these are no bake protein bars, you don’t need to babysit an oven. We’re just mixing and chilling our way to perfect high protein snacks. Follow these steps exactly, and you’ll have the best homemade protein bars in under an hour total!
Preparing the Base Mixture for Your Protein Bars
First things first: get your dish ready. Line an 8×8 pan with parchment paper, making sure you leave a little overhang on two sides. That overhang is your future self’s best friend when it comes time to lift the whole block out! Now, grab your bowl. Combine your dry stuff—the protein powder and the oats—and give them a good whisk so everything is evenly married together.
Next, we add the sticky elements: the peanut butter and the honey (or maple syrup, if you’re making mine vegan!). Now, you have to mix. I mean, really mix! Use a tough spoon or just dig your hands in there. Keep going until it looks like a thick, uniform dough. Seriously, you want that thick, uniform dough. If, by chance, you accidentally used a drier protein powder and it seems super crumbly and won’t come together, add water just one teaspoon at a time. Don’t flood it! Slow and steady wins this race.
Setting and Cutting Your Homemade Protein Bars
Once you have that perfect dough ball, press it into your prepared pan. This is crucial for texture! Use the bottom of a glass or your knuckles to press it down *firmly* and evenly. You aren’t gently patting it; you are compacting it gently. This firmness is what guarantees those incredibly satisfying, chewy protein bars we talked about. Now, if you’re feeling fancy, melt your chocolate and spread that thin top layer on. Pop the whole thing into the fridge and let it chill for at least a full hour. That hour is non-negotiable; if you cut it early, you’ll have a mess rather than bars!
When it’s firm, use those parchment paper “handles” to lift the entire slab out onto a cutting board. Slice it into 10 or 12 even pieces. See? No oven, no stress, just perfect easy protein bars. I sourced some great tips on making sure homemade versions stay firm over at this great article, but honestly, chilling is 90% of the battle!
Ingredient Notes and Customizing Your High Protein Snacks
One of the best parts about making your own protein bars is that you are totally in control! You get to decide if they fit your diet goals for the day. If you’re looking for healthy snack bars that fit specific needs, like keeping them completely plant-based, these notes are for you. We’ve kept the core recipe super simple, but it’s very adaptable!
Making Vegan Protein Bars or Adjusting Sweeteners
If you’re aiming for vegan protein bars, switching is easy! Just swap the honey for maple syrup. That’s really the only non-vegan element in the base recipe. Keep in mind that maple syrup is a little thinner than honey, so your dough might feel slightly looser. If that happens, don’t panic! Just add one extra teaspoon of protein powder to the mix until it firms back up to that perfect, cohesive dough consistency we love.
Flavor Variations for Chocolate Protein Bars
Love that dark chocolate richness but maybe want it throughout the whole bar, not just on top? The recipe notes mention a fantastic trick to deepen the flavor profile. You can replace about two tablespoons of the rolled oats with unsweetened cocoa powder. This not only boosts the chocolate factor but it also leans the texture toward that fudgy, rich center you find in some of the fancier bars. It’s a super easy way to create incredible, homemade chocolate protein bars.
Tips for Success When Making Protein Bars
Look, even the simplest recipes can throw you a curveball, especially when you are trying to get these meal prep bars tucked away for the busy week ahead. I’ve definitely had batches that were a little too gooey coming out of the fridge, or batches that crumbled before I got them wrapped. But once you know the little tricks, you gain total control over these homemade protein bars. It’s all about knowing how to adjust your binders and dry ingredients right at the mixing stage!
Achieving the Perfect Firmness for Protein Bars
This is the make-or-break moment when you are mixing your dough. You want it firm enough that it holds its shape when you press it into the pan, but not so dry that it resists mixing entirely. If you find your dough is just slightly too sticky and seems like it will melt all over your parchment paper when you try to cut it, my trick is to slowly beat in just one more tablespoon of your protein powder. That extra scoop usually absorbs the extra wetness perfectly.
On the flip side, if you added your honey and things just won’t come together—it’s looking dry, dusty, or crumbly—don’t worry! It’s an easy fix. Just add one teaspoon of water or milk at a time until those ingredients reluctantly decide to combine. It shows you put in the love, but remember, you can find some handy tips on structure over at this site too! And don’t forget to review our privacy policy right here at Bring Dish when you’re done hanging out in the kitchen!
Storage and Make Ahead Protein Bars Strategy
Since these are no bake protein bars, our storage plan is super important, especially if you’re making a big batch for meal prep bars. The good news is they are happy in the fridge! I always line an airtight container with a sheet of parchment paper first, then stack the bars inside. This stops them from sticking to each other, which is a total nightmare when you’re hungry.
They stay perfectly soft and fresh in the refrigerator for up to 10 days. If you’re making them for travel or just want them on hand for months, pop them in the freezer! They thaw completely in about 15 minutes on the counter, or you can even eat them slightly frozen for a firmer bite. This is the best way to always have a quick protein snack ready to go without any daily effort.
Frequently Asked Questions About Protein Bars
I always get a few questions once people try making these! It’s natural when you’re moving away from the grocery store aisle and into your own kitchen. I’m happy to share whatever I’ve learned about making great protein bars that work for *you*. Whether you’re looking for low sugar protein bars or just need bulk storage advice, let’s cover the bases here. If you have other tweaks, feel free to drop us a line over at the contact page!
Can I freeze these easy protein bars?
Absolutely! Since these are such fantastic make ahead protein bars, freezing is the way to go if you make a big batch and know you won’t eat them within a week. My recommendation is to cut them first, and then wrap each little square individually in plastic wrap or parchment paper before tossing them into an airtight container. This prevents them from fusing together into one giant, delicious brick you can’t separate later!
How can I make these low sugar protein bars?
Getting the sweetness down is important for some folks, and luckily, the binder—the honey—is easy to swap out for something sweeter and virtually zero-calorie. You’ll want a liquid sweetener mimic, like a good quality liquid monk fruit or stevia blend that measures cup-for-cup like syrup. If you use a very thin liquid alternative, you might need to add just another tablespoon of your protein powder to keep the dough firm enough for cutting. Check out some keto protein bars homemade ideas on this site for more inspiration on sugar management!
Estimated Nutritional Profile for These Protein Bars
I always like to be totally upfront about what’s going into our bodies, especially when we are aiming for high protein snacks. Remember, these calculations are based only on the five core ingredients—we skipped the optional chocolate chips in the math here. When you are making your homemade protein bars, your final numbers will shift a bit depending on the brand of protein powder or peanut butter you choose, but this gives you a fantastic baseline!
Here is the estimated profile for one single bar (assuming 10 servings):
- Calories: About 190
- Protein: A solid 15 grams!
- Fat: Roughly 10 grams
- Carbohydrates: About 15 grams
See? That high protein count is exactly why these easy protein bars are my absolute favorite for keeping me full and energized between meals. It’s transparent, honest, and delicious!
Share Your Homemade Protein Bars Creations
Now that you have the secrets to making the most satisfying, chewy protein bars imaginable, I really want to see what you whip up! My passion—the whole reason I left the stressful boardroom behind—is to connect with people over food, and sharing your wins in the kitchen is the best part of this job.
Once you try these easy protein bars, please come back and drop a star rating below so others know how much you loved them. If you made any fun swaps or adjustments—maybe you made a batch of those chocolate ones I mentioned or tried almond butter instead—let me know in the comments! Seeing your photos and hearing that you nailed that perfect, non-chalky texture is what keeps me excited to share more healthy snack bars with the world.
If you need some final inspiration on chocolate variations for your next batch, check out this site for more ideas on dipping and drizzling. Happy baking—or, well, happy *no-baking*!
PrintEasy 5-Ingredient No-Bake Peanut Butter Protein Bars
Make these simple, chewy, no-bake protein bars at home. This recipe uses only five ingredients and is perfect for quick meal prep or an on-the-go high protein snack.
- Prep Time: 10 min
- Cook Time: 0 min
- Total Time: 70 min
- Yield: 10 servings 1x
- Category: Snack
- Method: No-Bake
- Cuisine: American
- Diet: Vegetarian
Ingredients
- 1 cup vanilla or unflavored protein powder
- 1/2 cup rolled oats
- 1/2 cup natural peanut butter
- 1/4 cup honey or maple syrup
- 1/4 cup dark chocolate chips (optional, for topping)
Instructions
- Line an 8×8 inch baking dish with parchment paper, leaving an overhang on two sides for easy removal.
- In a large bowl, combine the protein powder and rolled oats. Mix them well to ensure even distribution.
- Add the peanut butter and honey (or maple syrup) to the dry ingredients.
- Mix everything together using a sturdy spoon or your hands until a thick, uniform dough forms. If the mixture seems too dry, add one teaspoon of water at a time until it comes together.
- Press the dough evenly into the prepared baking dish. Press firmly to compact the mixture.
- If using, melt the chocolate chips slightly and spread them over the top layer.
- Place the dish in the refrigerator and chill for at least 1 hour, or until the bars are firm enough to cut.
- Use the parchment paper overhang to lift the block out of the pan. Cut into 10 to 12 equal bars. Store the bars in an airtight container in the refrigerator.
Notes
- For a vegan option, use maple syrup instead of honey and ensure your protein powder is plant-based.
- You can substitute peanut butter with almond butter or sunflower seed butter for a different flavor profile.
- If you want a fudgier texture, reduce the oats by 2 tablespoons and add 2 tablespoons of unsweetened cocoa powder.
Nutrition
- Serving Size: 1 bar
- Calories: 190
- Sugar: 6
- Sodium: 110
- Fat: 10
- Saturated Fat: 2
- Unsaturated Fat: 8
- Trans Fat: 0
- Carbohydrates: 15
- Fiber: 2
- Protein: 15
- Cholesterol: 5