
The holidays are wonderful, but let’s be honest—sometimes the pressure to bake feels like a massive chore! When my calendar fills up with parties and cookie exchanges, I need something that screams Christmas spirit without demanding hours in my oven. That’s where my recipe for **grinch oreo balls** jumps in to save the day. Watching these come together—that vibrant green, that little red heart—it reminds me exactly why I started Bring Dish. Food is connection, and these little truffles are connection made simple. They are entirely no-bake, universally loved, and just plain joyous to make, leaving more time for what really matters: sharing time with the people around your table.
- Why You Will Love Making These Grinch Oreo Balls
- Essential Ingredients for Perfect Grinch Oreo Balls
- Step-by-Step Guide: How to Make Grinch Treats
- Expert Tips for Perfect Grinch Oreo Balls Every Time
- Variations for Festive Oreo Truffles
- Serving Suggestions for Christmas Party Finger Foods
- Storage and Make-Ahead Tips for Grinch Oreo Balls
- Frequently Asked Questions About Grinch Oreo Balls
- Nutritional Snapshot of These Easy Christmas Desserts
- Share Your Whimsical Christmas Sweets Creations
Why You Will Love Making These Grinch Oreo Balls
I truly believe these are the easiest and cutest **no bake holiday treats** you’ll find this season. They use just five main ingredients—seriously! They come together fast, which means less stress for you. Plus, rolling the dough and adding those tiny red hearts is the perfect activity to share with younger helpers, making them fantastic for **kid friendly holiday baking**.
- Completely no-bake—skip the oven entirely!
- Perfectly portioned for easy grab-and-go serving.
- Ultra-rich chocolate flavor hidden inside the green shell.

Essential Ingredients for Perfect Grinch Oreo Balls
When you’re making something this cute, the quality of the foundation matters! For these **grinch oreo balls**, we keep the list short, which is one of the real appeals here. You’ll notice I use the entire Oreo—cookie and cream filling together. Don’t worry about scraping out the filling; that smooth creaminess is exactly what helps bind everything together once the cream cheese is added.
Here is what you’ll need to gather for your base:
- One full package (about 14.3 oz) of standard Oreo cookies—that’s the whole thing!
- 8 ounces of cream cheese, and please, make sure it’s fully softened. Cold cream cheese equals lumpy balls, and we don’t want that mess.
Next, for that signature Grinch look, you need the coating:
- 12 ounces of green candy melts. These melt like a dream.
- Just a touch of coconut oil (this is optional, but trust me, it makes dipping so much smoother!).
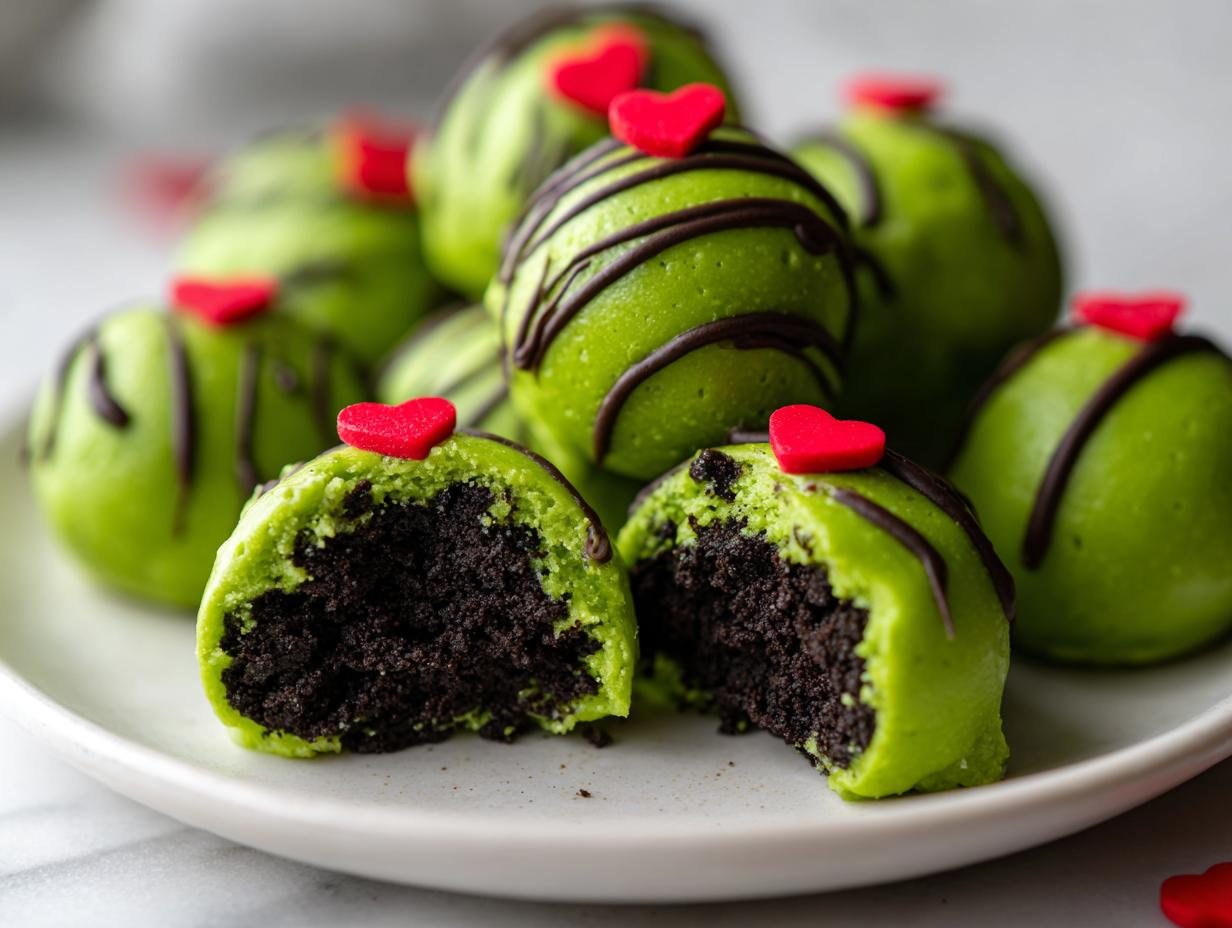
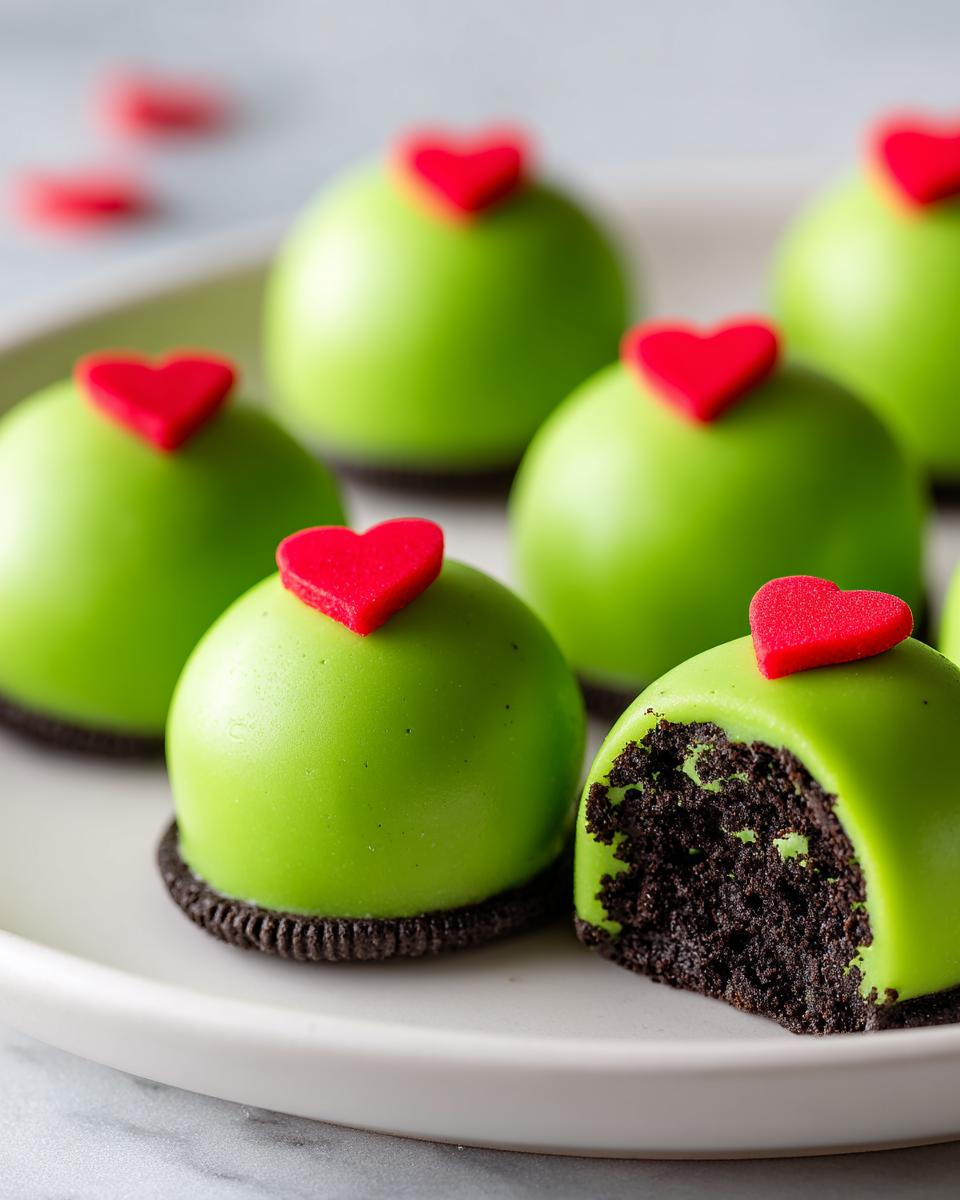
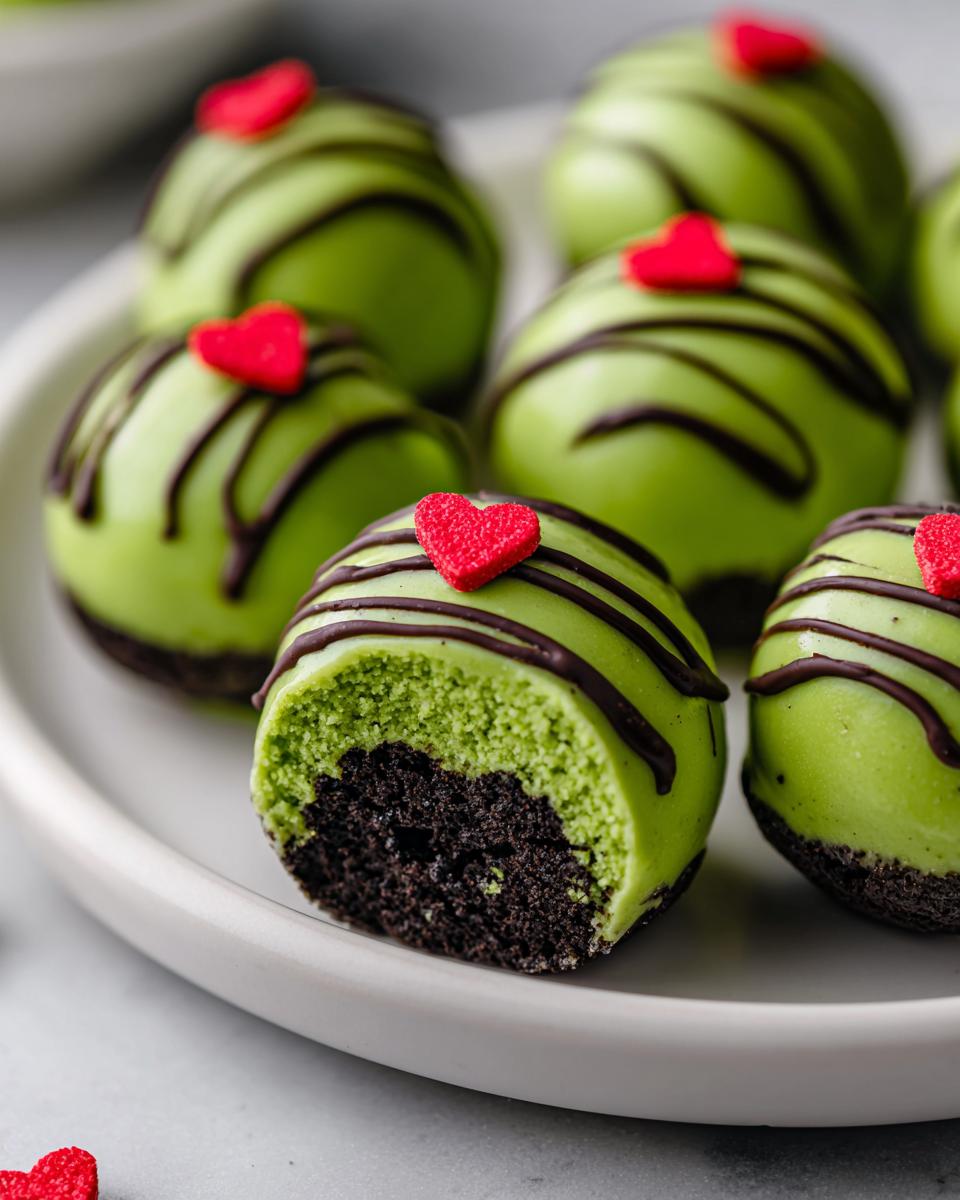
- And of course, the final touch: those super tiny red heart sprinkles. You can find these easily online or in holiday baking aisles.
If you’re looking for more inspiration, you can check out some of my favorite other sweets over on the desserts page!
Step-by-Step Guide: How to Make Grinch Treats
Okay, this is the fun part! Learning **how to make Grinch treats** is easier than rolling out pie crust, I promise. Once you get the base chilled, the decorating flies by. Just follow these steps closely, especially that chilling time. If your balls are too soft when you dip them, they just fall apart—and nobody wants a sad, melted Grinch!
Preparing the Oreo Truffle Base
First up, we need crumbs! If you have a food processor, pulse those Oreos until they look like fine sand. If you don’t, grab a sturdy zipper bag and a rolling pin; you want to pulverize them completely. Next, mix those crumbs right into your softened cream cheese. Use a spoon or a mixer until it all comes together into one cohesive, slightly sticky dough. Then, roll these bits into small, uniform balls—about one inch wide. Uniformity is key here so they all melt the coating evenly later. Pop this tray into the fridge for at least 30 minutes to firm up properly.
Mastering the Green Candy Melt Coating
While those are chilling, melt your green candy melts. Do this low and slow in the microwave, stirring every 30 seconds so they don’t burn. If your **green candy melt coating** seems super thick and heavy, stir in just a tiny bit of coconut oil. That oil is my secret weapon for a smooth dip! A quick note: if you decide to use food coloring on white chocolate wafers instead—please, please use oil-based coloring. Liquid coloring is water-based, and it will seize up your chocolate into a useless, gritty mess. We want silky coating only!
Finishing Your Grinch Oreo Balls
Once the balls are firm, it’s time for their green makeover. Dip each chilled ball completely into the melted coating. Lift it out, let the extra drip off—you can gently tap the spoon against the bowl edge. Now, here’s the crucial timing: before that green sets, immediately place one tiny red heart sprinkle right on top. That’s the Grinch’s heart! Set them back on the parchment paper right away. They only need about 15 minutes in the fridge or a little counter time to set completely hard, and then your adorable Christmas treats are ready to go.

Expert Tips for Perfect Grinch Oreo Balls Every Time
You know, years ago, I had a batch that just looked… sad. They weren’t sticking to the coating right, and they kept looking lumpy under the green layer. It drove me crazy! What I realized is that the temperature differential is everything here. You absolutely must have rock-solid cold Oreo balls before they hit that warm, melted candy. That deep chill ensures the coating sets instantly when it touches the surface, giving you that smooth, professional finish.
Another trick I learned the hard way? Don’t try to dip too many at once. I like to work in batches of six or seven. Dip those few, place your hearts, let them set for five minutes, and then go back for the next batch. This prevents the excess coating from pooling underneath the **grinch oreo balls**, which creates those thick, ugly “feet” at the bottom. When I started managing the temperature of the base and the coating separately, my presentation went from messy to wonderful overnight!
If you are looking for even more fantastic holiday recipes to round out your dessert table, you must check out this great roundup from Jennifer over at Well-Rooted Motherhood. It’s full of inspirational ideas!
Variations for Festive Oreo Truffles
While my standard **grinch oreo balls** are perfect for a classic look, you know I love tinkering when the holidays roll around! If you want to mix things up for your cookie exchange, these truffle bases are super flexible. My absolute favorite twist is trying out **red velvet oreo recipes** instead of the standard chocolate ones. The deep red crumb inside that bright green shell? Wow, talk about dramatic!
Also, don’t feel tied down only to the little red hearts. If you’re short on those specific sprinkles, you can easily swap them out! Use a single silver or gold nonpareil to make it look like Christmas ornamentation instead of Grinch hearts. Or, if you want a tangier kick, add a tiny bit of lemon zest to the cream cheese mixture before rolling. It keeps them feeling fresh even after a few days on the table. You can check out some of my other go-to holiday sweets that are just as easy right here on the desserts section!
Serving Suggestions for Christmas Party Finger Foods
These **grinch oreo balls** are built to be showstoppers on any holiday platter. Because they are perfectly contained and bite-sized, they are ideal **christmas party finger foods**. They look amazing when nestled among greener treats, like mint snowballs, or contrasting with dark chocolate items.
When you’re building your **christmas dessert table ideas**, cluster these truffles with clear crystal or white serving dishes. The bright green just pops! They pair wonderfully with simple, warm coffee or even a glass of chilled white cranberry mocktail. They’re so quick to display, which is exactly what I love when I’m rushing before guests arrive. For some other fun presentations, check out these truffle ideas from Martha Blogger!
Storage and Make-Ahead Tips for Grinch Oreo Balls
One of the best things about relying on these **grinch oreo balls** is that they are built for planning ahead! You really need that chilling time for the center anyway, so why not bake them days before the big party? I usually aim to have them completely dipped and decorated about three days before I need them. They stay wonderfully fresh when kept chilled in an airtight container. Just make sure to put a layer of wax paper between any layers so those cute little hearts don’t get smudged!
If you’re really pressed for time and need to make these way out in advance, they freeze beautifully, too. Pop the finished, coated balls onto a sheet tray and freeze them solid. Then, transfer them to a freezer-safe bag. They keep well for about a month. This makes them fantastic **easy holiday gifting desserts**—just set them out a few hours before gifting, and they are perfect. Never put the uncoated truffle base in the freezer for too long, though; the cream cheese gets a little strange texture-wise if frozen for weeks.
Frequently Asked Questions About Grinch Oreo Balls
I know sometimes when you look at a recipe, you just have one or two lingering questions before you start crushing cookies! Don’t worry, I get asked the same things all the time. Here are a few common questions about making these fun **grinch themed food** items. If you can’t find the answer here, please feel free to reach out to me directly through the contact page!
Can I use different cookies instead of Oreos for these treats?
You absolutely can, but you have to know you’re changing the texture slightly! The standard Oreo—the dark chocolate wafer with the white cream center—is my go-to because that filling helps the dough bind perfectly with the cream cheese. If you use a different sandwich cookie, like a Golden Oreo, the texture will be a bit softer once mixed. And hey, if you used those Red Velvet Oreos I mentioned earlier, you’ll get that gorgeous, slightly crumbly texture that looks amazing peeking through if your green coating cracks even a little bit!
What is the best way to store these festive oreo truffles?
These **festive oreo truffles** honestly taste best when they’ve had a little time in the cold. I always store them in a sealed, airtight container in the refrigerator. They stay perfectly fresh like this for up to two weeks, just like I mentioned before. When you’re ready to serve them at your party or event, pull them out about 15 minutes ahead of time. That chill helps them hold their shape, but letting them warm up just slightly softens the center perfectly for the best flavor experience.
Are these Grinch Oreo Balls considered Christmas cookie exchange recipes?
One hundred percent, yes! These are arguably one of the best **Christmas cookie exchange recipes** out there for a few reasons. First, they are no-bake, so you don’t have to worry about oven space when everyone else is baking cookies. Second, they are robust and travel really well when kept cool. Since they are perfectly **bite sized Christmas sweets**, they travel perfectly packed neatly into a tiered container. Everyone loves seeing something whimsical like this on the exchange table!
Nutritional Snapshot of These Easy Christmas Desserts
I always say that while these **grinch oreo balls** are totally show-stoppers, they aren’t exactly health food, are they? They are meant for joy and celebrating! Based on the core ingredients listed here, here’s a little peek at what you’re looking at per serving (one truffle). Please remember, this is just an estimate; actual numbers can shift based on the exact brand of Oreos or melts you grab. For details on how we handle user data, check out our privacy policy.
- Calories: About 135
- Fat: 8g
- Carbohydrates: 16g
- Protein: 1g
Share Your Whimsical Christmas Sweets Creations
The best part of cooking for me, and honestly, the whole reason I started Bring Dish, is seeing the food actually make it to the table and seeing the joy it brings! Now that you know exactly how to whip up these super fun **grinch oreo balls**, I truly want to hear about your experience. Did the green set just right? Did the little hearts steal the show at your party?
Please, don’t be shy! Leave a rating and a comment right down below. Tell me if you tried the red velvet variation or if you stuck to the classic chocolate. I read every single note you leave; they help me know what kind of recipes you all enjoy most for your gatherings.
If you snap a picture of your beautiful, bright green truffles sitting on your dessert platter, tag me on social media! Seeing your family enjoying these **whimsical christmas sweets** is the highlight of my holiday season. Come join our community and let’s keep sharing the joy of the table. You can always learn more about the heart behind this site on my About page!
PrintNo-Bake Grinch Oreo Balls

Make these adorable Grinch Oreo Balls for a festive, no-bake holiday treat. They feature a chocolate cookie center coated in bright green candy melts and topped with a small red heart sprinkle, perfect for Christmas parties or gifting.
- Prep Time: 25 min
- Cook Time: 5 min
- Total Time: 60 min
- Yield: 32 servings 1x
- Category: Dessert
- Method: No-Bake
- Cuisine: American
- Diet: Vegetarian
Ingredients
- 1 package (14.3 oz) Oreo cookies (about 36 cookies)
- 8 oz cream cheese, softened
- 12 oz green candy melts
- 1 teaspoon coconut oil (optional, for smoother dipping)
- Small red heart sprinkles (for the Grinch’s heart)
Instructions
- Place the Oreo cookies in a food processor and pulse until fine crumbs form. If you do not have a food processor, place them in a sealed plastic bag and crush them thoroughly with a rolling pin.
- Transfer the cookie crumbs to a medium bowl. Add the softened cream cheese.
- Mix the crumbs and cream cheese together using a hand mixer or a sturdy spoon until a uniform dough forms.
- Roll the dough into small balls, about 1 inch in diameter. You should get about 30 to 36 balls. Place the balls on a baking sheet lined with parchment paper.
- Chill the Oreo balls in the refrigerator for at least 30 minutes. This step helps them firm up before dipping.
- Melt the green candy melts in a microwave-safe bowl according to package directions, stirring every 30 seconds. If the mixture is too thick, stir in the coconut oil.
- Dip each chilled Oreo ball into the melted green coating, ensuring it is fully covered. Gently tap the bottom of the spoon on the side of the bowl to remove excess coating.
- Place the coated ball back onto the parchment-lined baking sheet.
- Immediately place one small red heart sprinkle on top of each ball to resemble the Grinch’s heart before the coating sets.
- Allow the Grinch Oreo balls to set completely at room temperature, or place them in the refrigerator for 10-15 minutes to speed up the process.
- Serve these easy Christmas desserts or store them in an airtight container in the refrigerator.
Notes
- For the best texture, use the entire Oreo cookie, including the cream filling.
- If you cannot find green candy melts, you can use white chocolate melting wafers and add green oil-based food coloring. Do not use standard liquid food coloring as it will cause the chocolate to seize.
- These bite sized Christmas sweets keep well in the refrigerator for up to two weeks.
Nutrition
- Serving Size: 1 ball
- Calories: 135
- Sugar: 15
- Sodium: 75
- Fat: 8
- Saturated Fat: 4
- Unsaturated Fat: 4
- Trans Fat: 0
- Carbohydrates: 16
- Fiber: 0
- Protein: 1
- Cholesterol: 10