
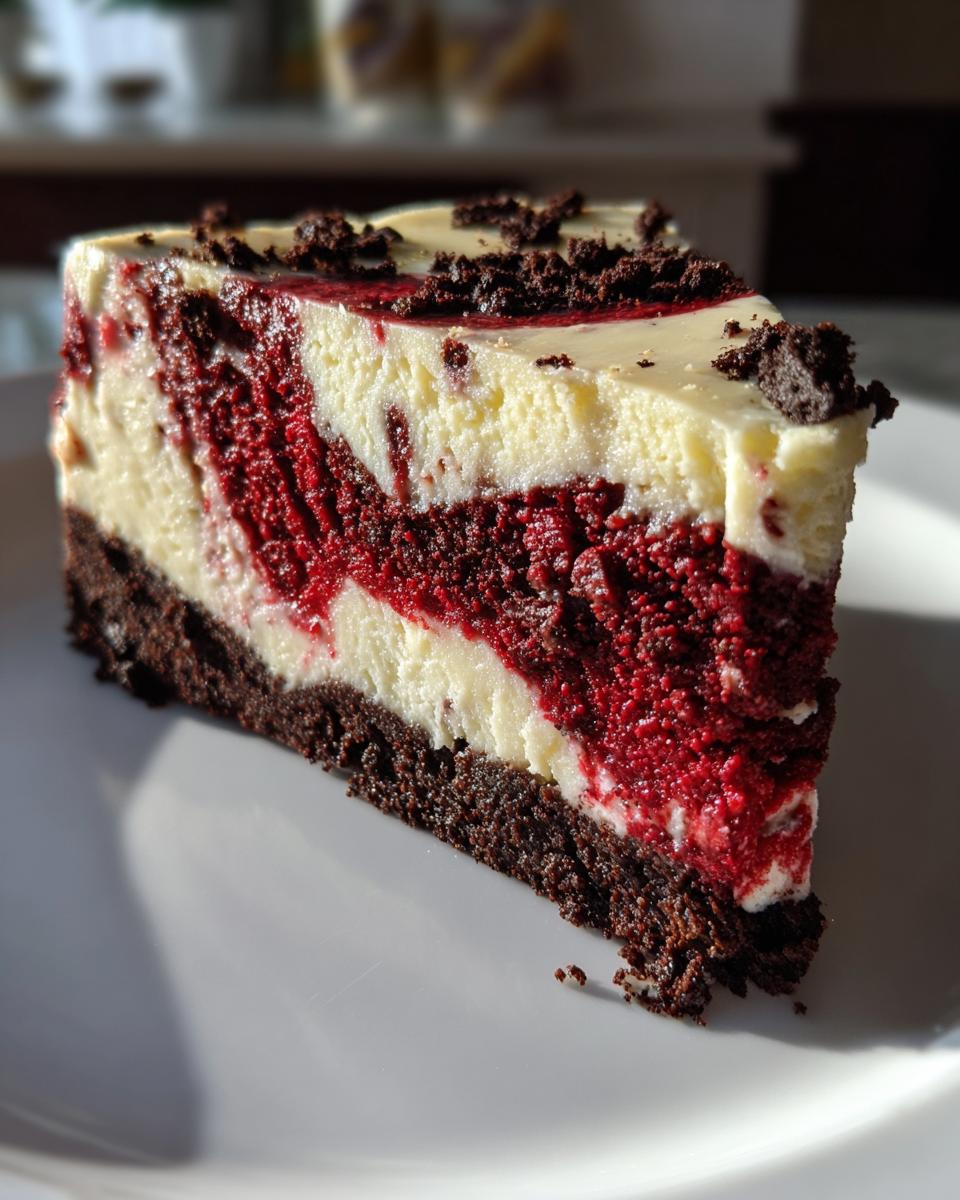
Let’s be honest: sometimes you just need a dessert that stops people in their tracks. You need something vibrant, something dramatic, something truly decadent for that special gathering. That’s exactly where this Showstopper Red Velvet Cheesecake comes into play! It takes everything you love about that rich, cocoa-laced red velvet cake and marries it perfectly with the silky, tangy wonder of a classic baked cheesecake.
When I started Bring Dish, the goal was always to show you that those big, impressive ‘showstopper desserts’ don’t have to be overly complicated. We want food that connects people, and nothing connects a crowd like slicing into a beautifully swirled, stunning dessert. This recipe blends the convenience of a boxed red velvet cake mix with the technique of a perfect cheesecake—it’s accessible baking for major impact.
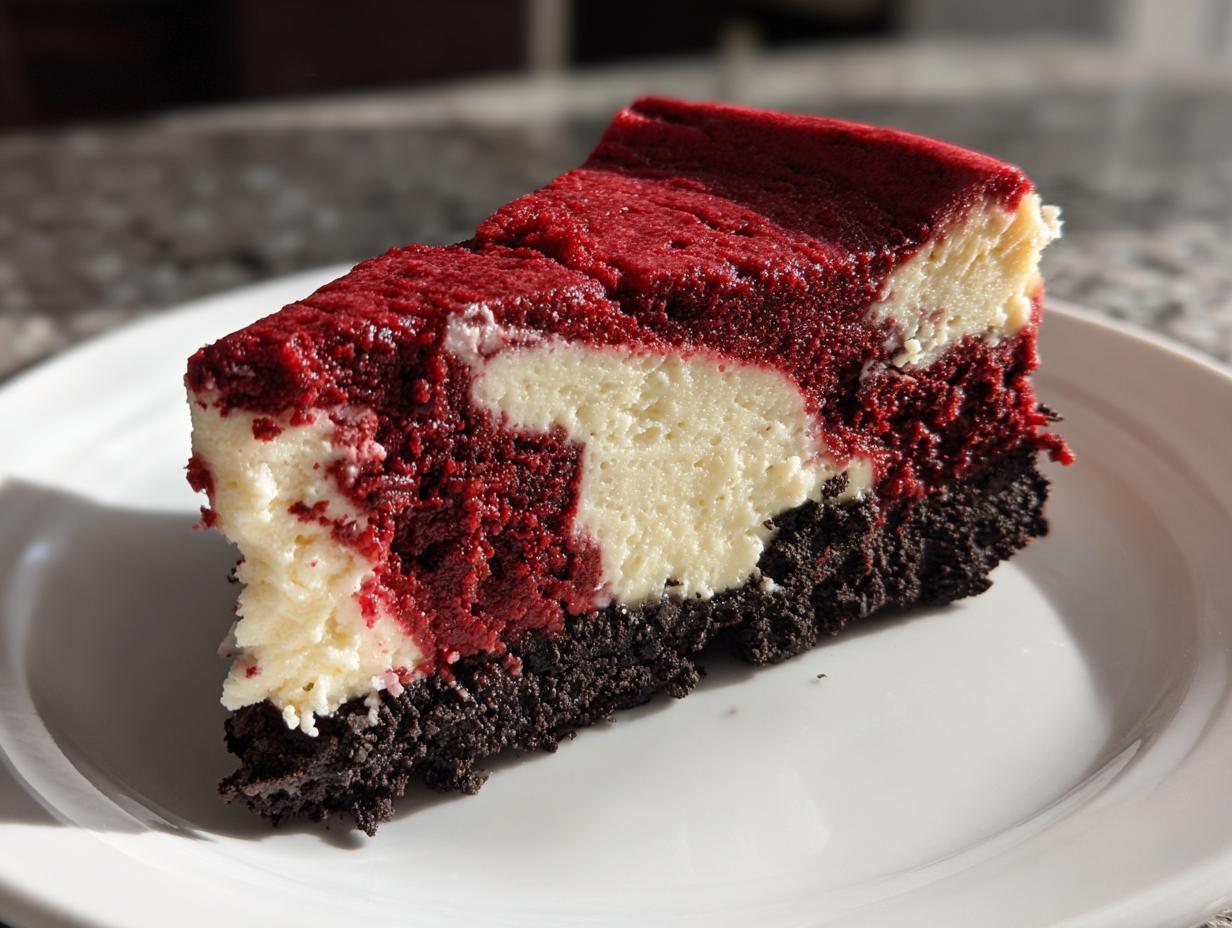
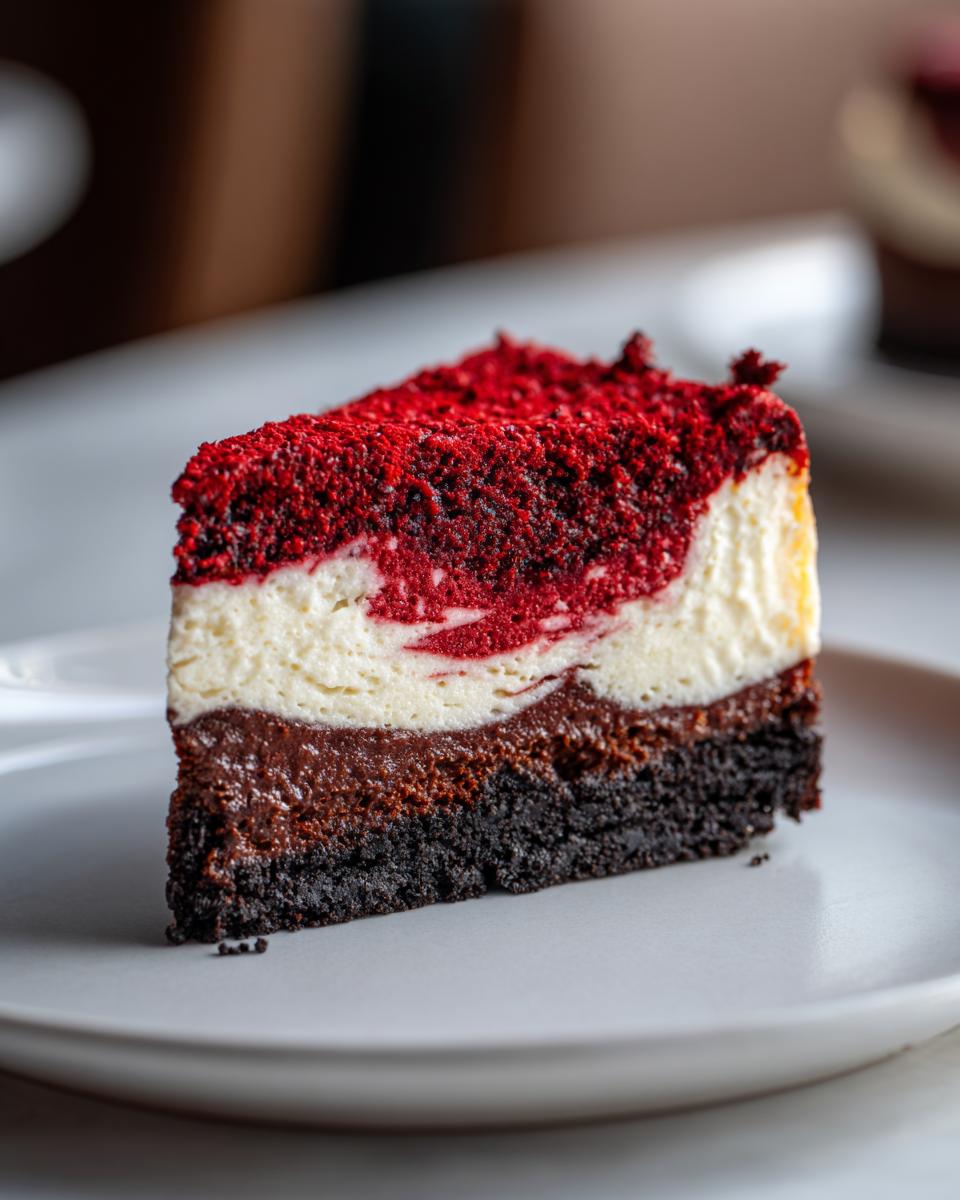
We are creating two distinct textures here: the deeply flavored, moist red cake component swirled right into a rich, creamy cheesecake filling, all sitting atop a crunchy chocolate base. Trust me, this fusion makes for the best cheesecake recipes you’ll ever serve. You can read more about why we focus on simple, connected eating over at our About Page.
- Why This Classic Red Velvet Cheesecake Recipe Works (EEAT Focus)
- Gathering Ingredients for Your Red Velvet Cheesecake
- Step-by-Step Instructions for the Showstopper Red Velvet Cheesecake
- Tips for a Stunning Dessert Presentation of Your Red Velvet Cheesecake
- Ingredient Notes and Substitutions for Red Velvet Cheesecake
- Serving Suggestions for This Decadent Red Velvet Dessert
- Storage and Reheating Instructions for Leftover Red Velvet Cheesecake
- Frequently Asked Questions About Making Red Velvet Cheesecake
- Estimated Nutritional Information for Red Velvet Cheesecake
- Share Your Stunning Dessert Creations
Why This Classic Red Velvet Cheesecake Recipe Works (EEAT Focus)
I absolutely adore this layered red velvet cheesecake because it solves a major dessert dilemma: why choose between cake and cheesecake when you can have both? This isn’t just another pretty dessert; it’s built for sharing and impressing guests. The combination of the sturdy, chocolatey Oreo crust, the velvety cheesecake, and that ribbon of vibrant red velvet makes it one of my go-to recipes for any gathering.
It’s my secret weapon for when I need a genuinely showstopper dessert without spending hours fussing over complicated scratch components. This fusion results in the most wonderfully creamy red velvet dessert you can imagine. It travels well, holds its shape beautifully—all the practical elements I always look for in a crowd-pleaser!
The Perfect Texture: Creamy Cheesecake Meets Moist Cake
The real magic here lies in the texture dance happening inside that springform pan. We use a quality red velvet cake mix strictly for the cake portion, and let me tell you why: it guarantees a wonderfully moist crumb that won’t dry out next to the tangy, dense cheesecake filling. Where the cheesecake provides that essential, rich creaminess, the cake component dissolves beautifully into the swirl, adding depth without ever becoming heavy.
Because we incorporate the cake batter right into the cheesecake batter before baking, you get this incredible, almost marbled effect. It’s lush, it’s smooth, and frankly, it’s addictive. It’s texture perfection, every single time.
Gathering Ingredients for Your Red Velvet Cheesecake
Okay, let’s talk about what you need to get together for this masterpiece. Since our approach here at Bring Dish is always about bringing amazing food into your busy life, you’ll notice we lean on a box of red velvet cake mix for the cake element. It cuts down the fuss but keeps that incredible, festive flavor, making this Red Velvet Cheesecake recipe totally manageable!
When you look at this list, make sure your cream cheese and sour cream are truly softened—I mean, room temperature soft. Cold cream cheese is the enemy of smooth cheesecake, trust me! Get your ingredients ready, and we’ll jump right into the steps.
Ingredients for the Oreo Crust Cheesecake Base
- 1 1/2 cups crushed Oreo cookies (that’s about 30 cookies, give or take a few for snacking!)
- 6 tablespoons unsalted butter, melted
Components for the Red Velvet Cheesecake Batter
This is the rich, plain part of the filling. Remember, room temperature is your friend here for that super smooth texture:
- 24 ounces cream cheese, softened
- 1 1/2 cups granulated sugar
- 1 teaspoon vanilla extract
- 1/4 cup all-purpose flour
- 1/2 cup sour cream
- 2 large eggs
Assembling the Red Velvet Cake Component
For the vibrant swirl, we need to mix the box ingredients with a few extras to enhance that classic ‘velvet’ tang:
- 1 box (15.25 oz) red velvet cake mix (plus other ingredients listed on that box)
- 1 teaspoon white vinegar (for the cheesecake mix)
- 2 tablespoons unsweetened cocoa powder
- 2 teaspoons red food coloring (I strongly suggest using the gel kind; it gives you amazing color without thinning out the batter!)
- 1/2 cup buttermilk
- 1 teaspoon baking soda
- 1 teaspoon white vinegar (this one is for the cake batter boost!)
Step-by-Step Instructions for the Showstopper Red Velvet Cheesecake
Alright, let’s get baking! This recipe might look like a lot of steps, but that’s just because we are building layers of deliciousness for this ultimate homemade cheesecake tutorial. Take it easy, one part at a time, and you’ll have a slice of heaven ready for your next big event. Don’t be intimidated by the water bath; it’s the key to that super smooth, crack-free finish we are aiming for!
Preparing and Baking the Oreo Crust Cheesecake Foundation
First things first, we need a solid, crunchy base. Preheat your oven to 350°F (175°C) for this step. In a bowl, just mix those 1 1/2 cups of crushed Oreos with the 6 tablespoons of melted butter until it looks like wet sand. You need to press this mixture down *really* firmly into the bottom of your 9-inch springform pan. I like to use the flat bottom of a measuring cup to really pack it tight!
Bake that crust for just 10 minutes. This sets it up nicely so it doesn’t get soggy later. Once it’s done, pull it out and let it cool a bit while you start the filling. Then, immediately—this is important!—reduce your oven temperature down to 325°F (160°C). We cook the cheesecake low and slow.
Mixing the Creamy Cheesecake Batter
Time for the star! In a large bowl, take your softened cream cheese, the 1 1/2 cups of sugar, and the vanilla. Beat them until they are just smooth—no lumps remaining. Next, add your flour and the sour cream, mixing gently. Finally, add your two large eggs, but you must add them in one at a time, mixing only until they disappear into the batter. Seriously, do not overmix the cheesecake batter once the eggs are in! Overmixing pushes too much air in, and that air is what causes cracking when it cools.
Creating the Vibrant Red Velvet Cake Batter
Now for the color! Follow the package directions for your red velvet cake mix, but use the liquid amounts listed on the box, not necessarily what I listed above for the plain cheesecake. In a separate small bowl, stir together the buttermilk, baking soda, and 1 teaspoon of vinegar—it will fizz a little! Add this fizzing mixture into your prepared cake batter. Then, stir in your cocoa powder and those 2 teaspoons of gel food coloring until you have that unmistakable deep, festive red color. Wow, the color alone is worth it!
Assembling and Swirling the Layered Red Velvet Cheesecake
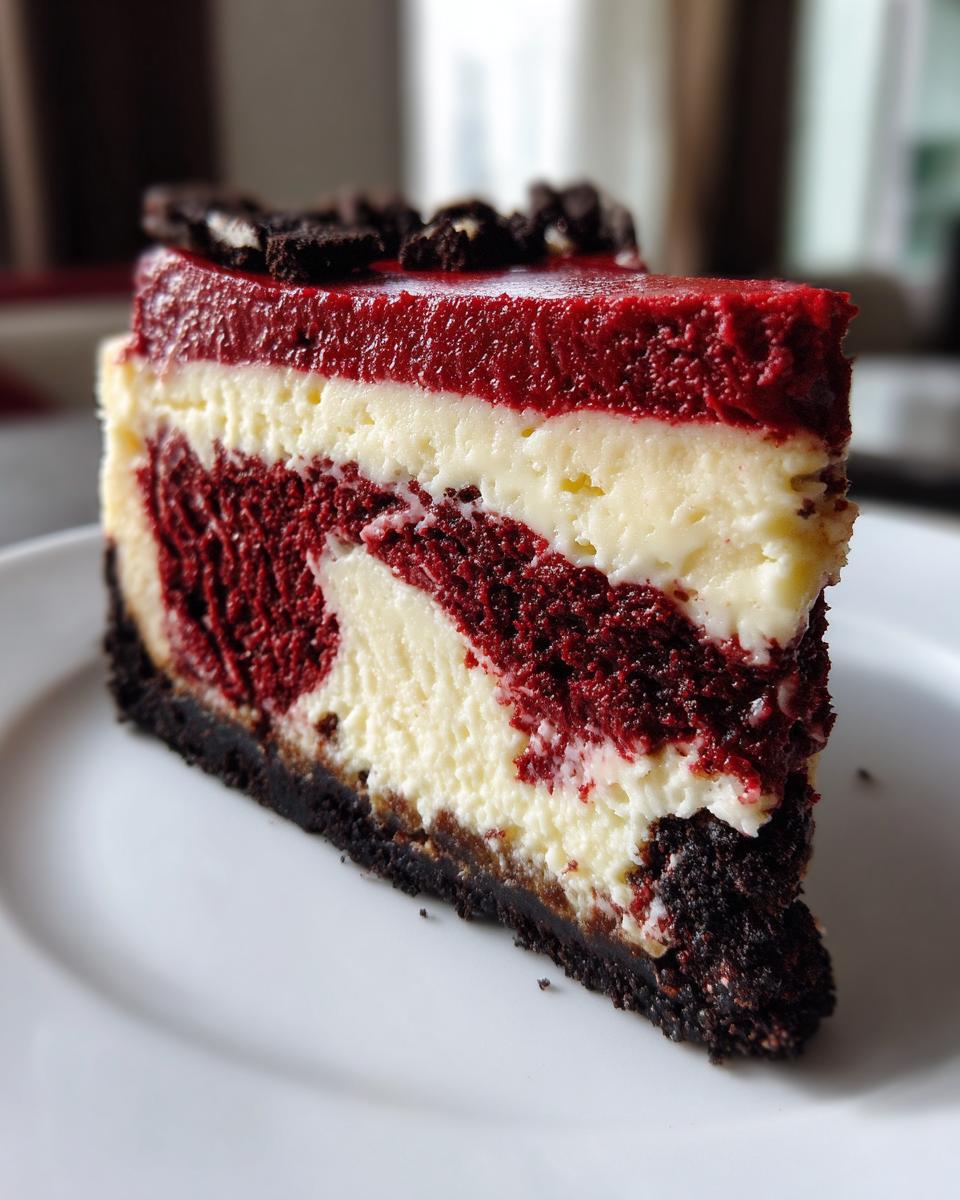
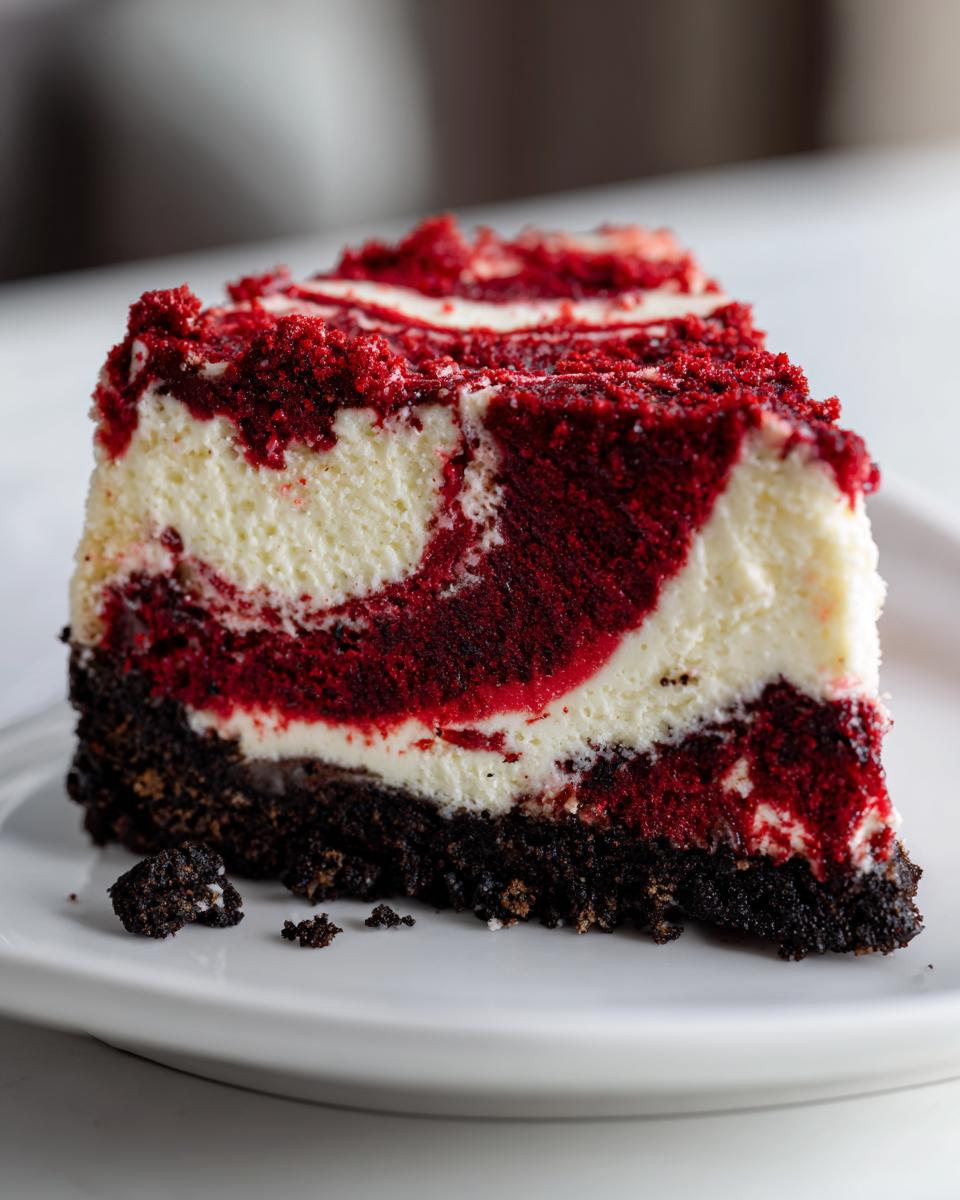
This is the fun, artistic part! Pour about half of your plain cheesecake batter right over that cooled Oreo crust. Next, take big spoonfuls or dollops of your vibrant red velvet cake batter and drop them randomly over the surface of the plain layer. Then, gently pour the remaining plain cheesecake batter over the red dollops. Don’t worry if it doesn’t cover perfectly; that helps the marbling effect!
Get that last bit of red velvet batter ready—mix that final teaspoon of vinegar in it. Drizzle this thin batter over the top for extra streaks. Then, take a knife or a wooden skewer and gently drag it through the batters just a few times. You want a beautiful marble effect, like those wonderful designs you see on festive holiday bakes. Don’t over-swirl, or you’ll just end up with pink cake!
The Water Bath Technique for Perfect Baking
This technique is non-negotiable for a creamy cheesecake! Take heavy-duty aluminum foil and wrap the entire outside bottom of your 9-inch springform pan very tightly. We need a seal so no water gets in there. Place the foil-wrapped pan inside a larger roasting pan.
Put both pans in the oven. Now, carefully pour piping hot water into the roasting pan until the water comes about halfway up the sides of your springform pan. This water bath creates humidity, which keeps the cheesecake baking gently and prevents drying. Bake it like this for 60 to 75 minutes. You’ll know it’s done when the edges look set, but when you gently nudge the pan, the very center still wobbles just a tiny bit—like thick Jell-O. That jiggle means it’s still creamy inside.
Cooling and Chilling for the Best Results
We have to beat the heat slowly, or we invite cracks! Once the baking time is up, turn the oven off completely. Prop the oven door open just an inch or two, and leave the cheesecake inside that warm environment for a full hour. This slow transition is so important.
After that hour, carefully remove the cheesecake from the water bath and let it cool completely to room temperature on a wire rack. Once it’s cool to the touch, cover it gently and move it to the refrigerator. You absolutely must chill this for at least 6 hours, but honestly? Overnight chilling makes it the most perfectly set, rich, and dense dessert you’ve ever made.
Tips for a Stunning Dessert Presentation of Your Red Velvet Cheesecake
Once that gorgeous red velvet cheesecake has chilled overnight, it’s time to make it into a true showstopper! We want that stunning dessert presentation for your guests. While the simple red and white swirl is beautiful on its own, a crown of topping really elevates this to one of the best festive desserts you can serve.
Remember those optional ingredients? If you want extra drama or extra richness, you’ll make that simple topping right before serving. You can get some great ideas on presentation over at this site, too!
Finishing Touches: Cream Cheese Frosting Dessert Topping
I usually make this whipped topping—I call it ‘my cloud’—because it’s so light compared to traditional thick cream cheese frosting. You need 1 cup of heavy whipping cream, 2 tablespoons of powdered sugar, and about half a teaspoon of vanilla extract. Beat them together until you get stiff peaks.
When you take your chilled cheesecake out, you can spread this whipped topping right over the top in swoops, or—if you have a piping bag—use a large star tip to pipe beautiful dollops around the outer edge. For the ultimate color pop, sprinkle a few extra crushed Oreos or some reserved red cake crumbs right on top of the white clouds before slicing!
Ingredient Notes and Substitutions for Red Velvet Cheesecake
When you’re making something this important—a true Red Velvet Cheesecake recipe—every ingredient matters! I always tell folks that quality and technique go hand-in-hand. Since we are using a standard cake mix for flavor, we really need to treat the cheese filling components with respect to make sure everything comes out perfectly creamy. Don’t skimp on softening that cream cheese; it’s the difference between smooth and lumpy, and we want smooth!
I learned a lot about substitutions over the years, especially when I couldn’t run to the store mid-bake! If you are looking for other great ways to approach this, like a fully no-bake version, you can certainly check those out later, but for this stunning layered dessert, a few ingredient choices make all the difference.
Handling Food Coloring and Cocoa Powder
Let’s talk color for a second. You see I asked for gel food coloring, and here’s why: Liquid coloring is mostly water, and water is the enemy of a thick, beautiful cheesecake batter. If you dump in too much liquid coloring to get that deep, dark red, you end up thinning out your cheesecake batter, and that can cause cracks or prevent the swirl from holding its shape.
Gel colors are concentrated pigment, so you use way less product to get that deep, vibrant color we need for a proper red velvet look. The cocoa powder we use is unsweetened; it’s not there for sweetness, but to give that signature subtle chocolate background note that red velvet is famous for. Don’t skip it!
Can I Make a No Bake Red Velvet Cheesecake Version?
That’s a great question if you’re short on oven space or just trying to avoid turning the oven on! Now, this specific recipe is designed to be baked because the water bath technique creates that unbeatable, silk-like texture. The structure relies on those baked eggs setting up slowly.
If you are really set on avoiding the oven, you can absolutely look for a fantastic no bake red velvet cheesecake alternative! Those recipes usually rely on stabilizers like gelatin or whipped cream folded into cream cheese to get that set, which yields a lighter, mousse-like texture rather than the dense creaminess we achieve here. Just know that this recipe stays true to the classic baked style for the richest experience!
Serving Suggestions for This Decadent Red Velvet Dessert
This rich, beautiful red velvet cheesecake needs a pairing that can stand up to its incredible flavor profile. Since it’s so decadent on its own, often you don’t need much else! If you’re looking for holiday cheesecake ideas, I always suggest serving it slightly chilled, not ice-cold, so the cream cheese is still soft when you slice it.
For Valentine’s Day or any special romantic dessert, a delicate dusting of cocoa powder on the plate really makes the color pop. If you want a little something extra, a drizzle of high-quality melted white chocolate or even a scattering of fresh raspberries cuts through the richness beautifully. Honestly, though, just a really good strong cup of coffee is the perfect accompaniment for this showstopper!
Storage and Reheating Instructions for Leftover Red Velvet Cheesecake
Now, let’s be real—the odds of having leftovers of this incredible red velvet cheesecake are slim, but you need to know how to keep it perfect just in case you do! Cheesecake is an amazing make-ahead dessert, and it actually gets even better after setting in the fridge for an extra day or two.
The most important thing you need to remember is that this beautiful layered dessert must stay cold. Never think about reheating cheesecake! Heating it up will melt that perfect cheesecake structure we worked so hard to achieve with the water bath, turning it into a soupy mess. We want to preserve that creamy texture.
Here is my simple storage plan:
- Chilling Time: Always keep the cheesecake refrigerated. It’s good for up to 4 or 5 days tucked away in the fridge.
- Airtight Protection: Once you’ve sliced into it, cover the cut edges with plastic wrap first. This stops the exposed cheesecake from drying out or absorbing any funky fridge smells. Then, cover the whole thing loosely with foil or place the springform ring back on if you are storing it that way.
- Serving Tip: For the absolute best eating experience, pull your chilled slice out of the refrigerator about 20 to 30 minutes before you plan to eat it. This just takes the chill off the cream cheese layer, making it taste even richer and creamier.
If you managed to save a piece long enough for it to start tasting a little dry (which happens around day four), the best way to revive it is actually to add a little extra dollop of my simple whipped topping right before serving. It’s like a mini ‘fresh coat’ of deliciousness!
Frequently Asked Questions About Making Red Velvet Cheesecake
It’s totally normal to have questions when you are tackling a major dessert like this! We want every single person who tries this Red Velvet Cheesecake recipe to feel successful. I gathered the questions I hear most often about making this dessert gorgeous and crack-free. Don’t hesitate to reach out if you need more help; you can always contact us!
Why is my red velvet cheesecake cracking?
Oh, cheesecake cracking—the eternal mystery! Honestly, it usually comes down to three things, and none of them are your fault if you didn’t know the secrets! First, the biggest culprit is overmixing the cheesecake batter once those eggs are in there. You incorporate too much air, and when it bakes and cools, that air expands and causes a big fissure. Mix those eggs in gently, just until they are incorporated.
Second, if you cool it too fast, it shrinks too quickly and cracks! That’s why we use that crucial one-hour slow cool inside the turned-off oven. It lets the cheesecake settle down gracefully. Finally, if your water bath wasn’t tight enough or you skipped it entirely, the edges set faster than the center, leading to stress cracks. The water bath is your best friend for that perfectly smooth finish!
Can I use a different crust instead of Oreo crust cheesecake?
You totally can! While I am completely obsessed with the dark, crunchy contrast of the Oreo crust cheesecake base with the red velvet, if you don’t have Oreos on hand or just prefer something else, shortbread cookies or graham crackers work beautifully too. You’ll use the same amount—1 1/2 cups of crumbs—and the same amount of melted butter (6 tablespoons).
If you use graham crackers, you will naturally get a slightly lighter, more caramelized flavor profile than the deep chocolate vibe the Oreos give us. Either way, make sure you press it firmly into the bottom of that springform pan and pre-bake it for 10 minutes at 350°F to set it before you ever touch the filling. A strong foundation is key!
Estimated Nutritional Information for Red Velvet Cheesecake
I always get asked about the nutrition facts, and while this is definitely a rich, indulgent dessert worthy of a celebration, it’s good to know where you stand! Because we’re using high-quality cream cheese, butter, and a whole cake mix component, this is designed to be a rich treat. Keep in mind that this information is an estimate based on the ingredients listed and assumes 12 equal servings. The brands you use can definitely change these numbers!
Here is the breakdown for one glorious slice of this red velvet cheesecake:
- Serving Size: 1 slice
- Calories: 450
- Sugar: 45g
- Sodium: 350mg
- Fat: 28g
- Saturated Fat: 17g
- Unsaturated Fat: 11g
- Trans Fat: 0.5g
- Carbohydrates: 48g
- Fiber: 1g
- Protein: 7g
- Cholesterol: 110mg
So yes, it’s dense, it’s packed with flavor, and it’s meant for special occasions—think holidays, birthdays, or maybe just a Tuesday where you really deserve something spectacular! We aren’t making a diet dessert here; we are making core memories around the table, and that’s what counts most!
Share Your Stunning Dessert Creations
That’s it! You’ve made the showstopper red velvet cheesecake! Now comes my favorite part: seeing how you brought this brilliant dessert to life in your own kitchens. I truly believe that food tastes better when it’s shared, and nothing makes me happier than hearing from you about how the recipe turned out.
If you gave this layered delight a try, please do me a huge favor and come back here to leave a rating! Stars tell me instantly what worked well, and if you leave a little comment describing your results—especially if you added a special garnish or served it for a particular celebration—that helps everyone else feel confident about baking it too.
And if you took a gorgeous photo of that vibrant swirl catching the light, I absolutely want to see it! Share it on social media and tag us so I can swoon over your presentation. We are building this community one delicious, impressive dessert at a time, and your creativity inspires me every single day. Happy baking, friends!
PrintShowstopper Red Velvet Cheesecake with Oreo Crust
Create a stunning, creamy Red Velvet Cheesecake featuring a rich Oreo crust and a vibrant red velvet swirl. This recipe merges the best of cake and cheesecake for a decadent dessert perfect for holidays or special gatherings.
- Prep Time: 30 min
- Cook Time: 75 min
- Total Time: 105 min
- Yield: 12 servings 1x
- Category: Dessert
- Method: Baking
- Cuisine: American
- Diet: Vegetarian
Ingredients
- 1 1/2 cups crushed Oreo cookies (about 30 cookies)
- 6 tablespoons unsalted butter, melted
- 24 ounces cream cheese, softened
- 1 1/2 cups granulated sugar
- 1 teaspoon vanilla extract
- 1/4 cup all-purpose flour
- 1/2 cup sour cream
- 2 large eggs
- 1 teaspoon white vinegar
- 2 tablespoons unsweetened cocoa powder
- 2 teaspoons red food coloring (gel preferred)
- 1/2 cup buttermilk
- 1 teaspoon baking soda
- 1 teaspoon white vinegar (for cake batter)
- 1 box (15.25 oz) red velvet cake mix (plus ingredients listed on box for cake portion)
- For Topping (Optional): 1 cup heavy whipping cream, 2 tablespoons powdered sugar, 1/2 teaspoon vanilla extract
Instructions
- Prepare the Crust: Preheat your oven to 350°F (175°C). Mix the crushed Oreos and melted butter. Press the mixture firmly into the bottom of a 9-inch springform pan. Bake for 10 minutes. Let the crust cool completely. Reduce oven temperature to 325°F (160°C).
- Make the Cheesecake Batter: In a large bowl, beat the softened cream cheese, granulated sugar, and vanilla extract until smooth. Beat in the flour, sour cream, and eggs one at a time, mixing just until combined after each addition. Do not overmix.
- Prepare the Red Velvet Cake Batter: Prepare the red velvet cake mix according to the package directions, but use the specified amounts for the liquid ingredients listed on the box. In a small bowl, mix the buttermilk, baking soda, and 1 teaspoon of vinegar; stir this into the cake batter. Add the cocoa powder and red food coloring, mixing until the color is uniform.
- Assemble the Cheesecake: Pour half of the plain cheesecake batter over the cooled Oreo crust. Gently spoon dollops of the red velvet cake batter over the cheesecake layer. Pour the remaining plain cheesecake batter over the red velvet dollops.
- Create the Swirl: In a small bowl, mix the remaining 1 teaspoon of vinegar into the remaining red velvet batter. Drizzle this over the top layer. Use a knife or skewer to gently swirl the layers together, creating a marbled effect. Do not swirl too deeply.
- Bake: Wrap the outside bottom of the springform pan tightly with heavy-duty aluminum foil. Place the pan in a larger roasting pan. Carefully pour hot water into the roasting pan until it reaches halfway up the sides of the springform pan (this is a water bath). Bake for 60 to 75 minutes, or until the edges are set but the center still jiggles slightly.
- Cool: Turn off the oven, crack the door open, and let the cheesecake cool inside the oven for 1 hour. Remove from the water bath and let it cool completely on a wire rack. Chill in the refrigerator for at least 6 hours, or preferably overnight, before serving.
- Finish (Optional): Beat the heavy whipping cream, powdered sugar, and vanilla until stiff peaks form. Spread or pipe over the chilled cheesecake before slicing.
Notes
- For the best texture, ensure your cream cheese is fully softened to room temperature before mixing.
- Wrapping the springform pan securely prevents water from the bath from seeping into the crust.
- If you skip the water bath, bake at 325°F (160°C) for 50-60 minutes, but watch carefully for cracks.
Nutrition
- Serving Size: 1 slice
- Calories: 450
- Sugar: 45
- Sodium: 350
- Fat: 28
- Saturated Fat: 17
- Unsaturated Fat: 11
- Trans Fat: 0.5
- Carbohydrates: 48
- Fiber: 1
- Protein: 7
- Cholesterol: 110