
Let’s be honest, the best desserts are the ones that fight back a little bit! I’m talking about that perfect, absolutely necessary texture contrast—the moment your fork sinks through something soft and buttery, only to hit that satisfying, audible *CRUNCH*. That is exactly what we are achieving today with what I think is the ultimate bake for any gathering: the Caramel Crunch Cake. Here at Bring Dish, we believe the food we share should create memories, and this showstopper cake guarantees that’s what happens. It’s rich, it’s sticky, it’s sweet, and it is designed to be the centerpiece of connection at your table.
- Why This Decadent Caramel Cake Stands Out
- Ingredients for Your Caramel Crunch Cake
- How to Prepare the Best Caramel Dessert
- Tips for Success Making Your Caramel Crunch Cake Recipe
- Ingredient Notes and Substitutions for This Crunchy Caramel Dessert
- Serving Suggestions for Your Celebration Cake Ideas
- Storage & Reheating Instructions for Leftover Caramel Crunch Cake
- Frequently Asked Questions About Making Caramel Crunch Cake
- Share Your Caramel Toffee Delight
Why This Decadent Caramel Cake Stands Out
When you decide to bake a celebration cake, you want fireworks, right? This is what elevates our Decadent Caramel Cake above the rest—it’s all about the experience. We aren’t just sweetening things up; we are creating real Texture Contrast Desserts that keep people coming back for a second slice. It’s a guaranteed crowd-pleaser.
The Secret to Moist Caramel Cake Layers
I’ve found that the difference between a good cake and an incredible one is moisture. We nail this by ensuring our batter has just the right fat-to-flour ratio, which is the secret to those unbelievably Moist Caramel Cake Layers. They hold up perfectly to the heavy topping we pile on later!
Making the Salted Caramel Frosting Recipe
Listen, plain vanilla frosting just won’t cut it here. We use a proper homemade buttery base for the Caramel Frosting Recipe, but the real magic comes from that pinch of salt. It cuts through the intense sweetness of the caramel, making every bite feel luxurious instead of overwhelming. It’s balanced decadence, I promise.
Ingredients for Your Caramel Crunch Cake
Okay, now for the fun part—gathering our treasures! For a cake this decadent, you absolutely must use good quality ingredients. Don’t substitute the butter in the cake layers; it’s what gives us that beautiful structure. Keep everything measured out before you start mixing! We are going to break this down into three parts so it’s totally manageable.
For the Buttery Cake Layers
- 2 cups all-purpose flour
- 1 1/2 teaspoons baking powder
- 1/2 teaspoon salt
- 1 cup unsalted butter, softened
- 1 3/4 cups granulated sugar
- 4 large eggs
- 1 cup whole milk
- 2 teaspoons vanilla extract
For the Salted Caramel Frosting Recipe
This rich mixture needs room-temperature butter to whip up light and fluffy. This is the heart of our Salted Caramel Frosting Recipe!
- 1 cup unsalted butter, softened
- 3 cups powdered sugar
- 1/2 cup homemade salted caramel sauce (plus extra for drizzling later!)
- 1 teaspoon vanilla extract
- 1/4 teaspoon salt
For the Homemade Caramel Crunch Topping
You have options here, but the homemade praline is just something special! This is the key to that amazing Homemade Caramel Crunch we keep raving about.
- 1 cup granulated sugar
- 1/2 cup chopped pecans or toffee bits (use what you love!)
- 2 tablespoons water
How to Prepare the Best Caramel Dessert
Putting together this Caramel Crunch Cake is such a rewarding process! Because we have three separate components, staying organized is key. If you get everything ready first, the actual assembly flies by. We are aiming for a total time of about 1 hour and 45 minutes, so let’s get moving!
Baking the Moist Caramel Cake Layers
First things first: get that oven preheated to 350°F (175°C) and grease up those two 8-inch pans. In one bowl, whisk your flour, baking powder, and salt. In your big mixing bowl, cream that softened butter and sugar until it looks fluffy—it should be pale yellow! Beat in the eggs one by one, making sure they incorporate fully. Now, alternate adding your dry mix and the milk, starting and finishing with the flour mix. Mix it gently until it’s *just* combined. Seriously, do not overmix, or we lose that moisture! Divide the batter, aim for even pans, and bake for 30 to 35 minutes until a toothpick comes out clean. Let them cool in the pans for just 10 minutes before you carefully pop them out onto a rack to cool completely. They must be cold before frosting!
Creating the Homemade Caramel Crunch
This step adds that perfect shatter! Grab a small saucepan and toss in the 1 cup of sugar and 2 tablespoons of water. Heat this over medium heat—but resist the urge to stir! Just let it bubble until it dissolves and turns a nice deep amber color. Immediately pull it off the heat and toss in your pecans or toffee bits. Stir fast! Pour that whole sticky mess onto a piece of parchment paper and just let it cool completely until it’s rock hard. Once it’s cool, break it up into those wonderful, aggressive little pieces you need.
Whipping the Caramel Frosting Recipe
Time to make the creamy armor for our layers! Beat that softened butter until it looks smooth. Now, gradually add the powdered sugar, just like you’re teaching it to behave. Once that’s incorporated, stream in that half-cup of salted caramel sauce along with the vanilla and salt. Beat it well until it’s light and spreadable—you want that perfect texture for your Caramel Frosting Recipe. If it seems a little too stiff, add one teaspoon of milk at a time until it loosens up perfectly for spreading, as per my notes over at our philosophy.
Assembling Your Layered Caramel Cake
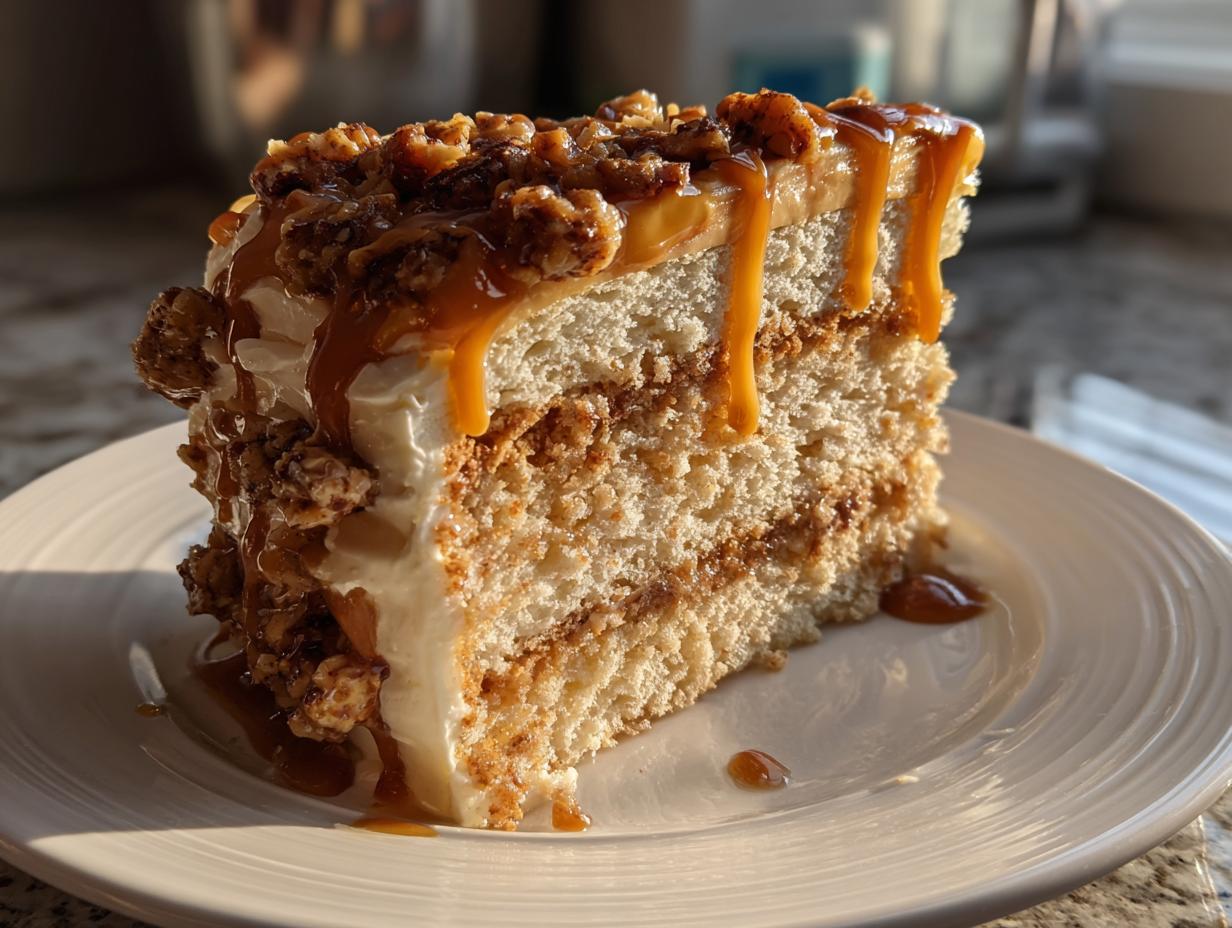
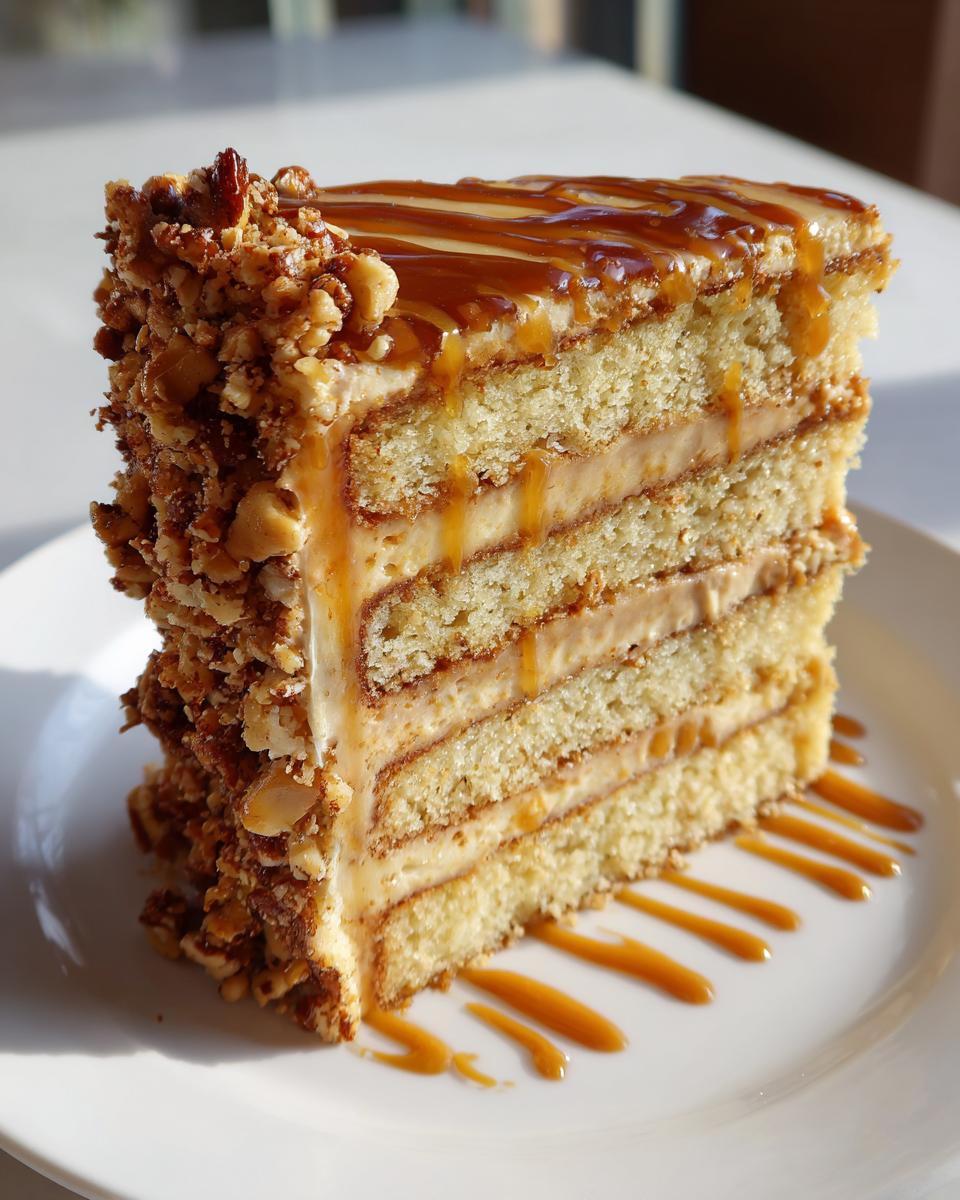
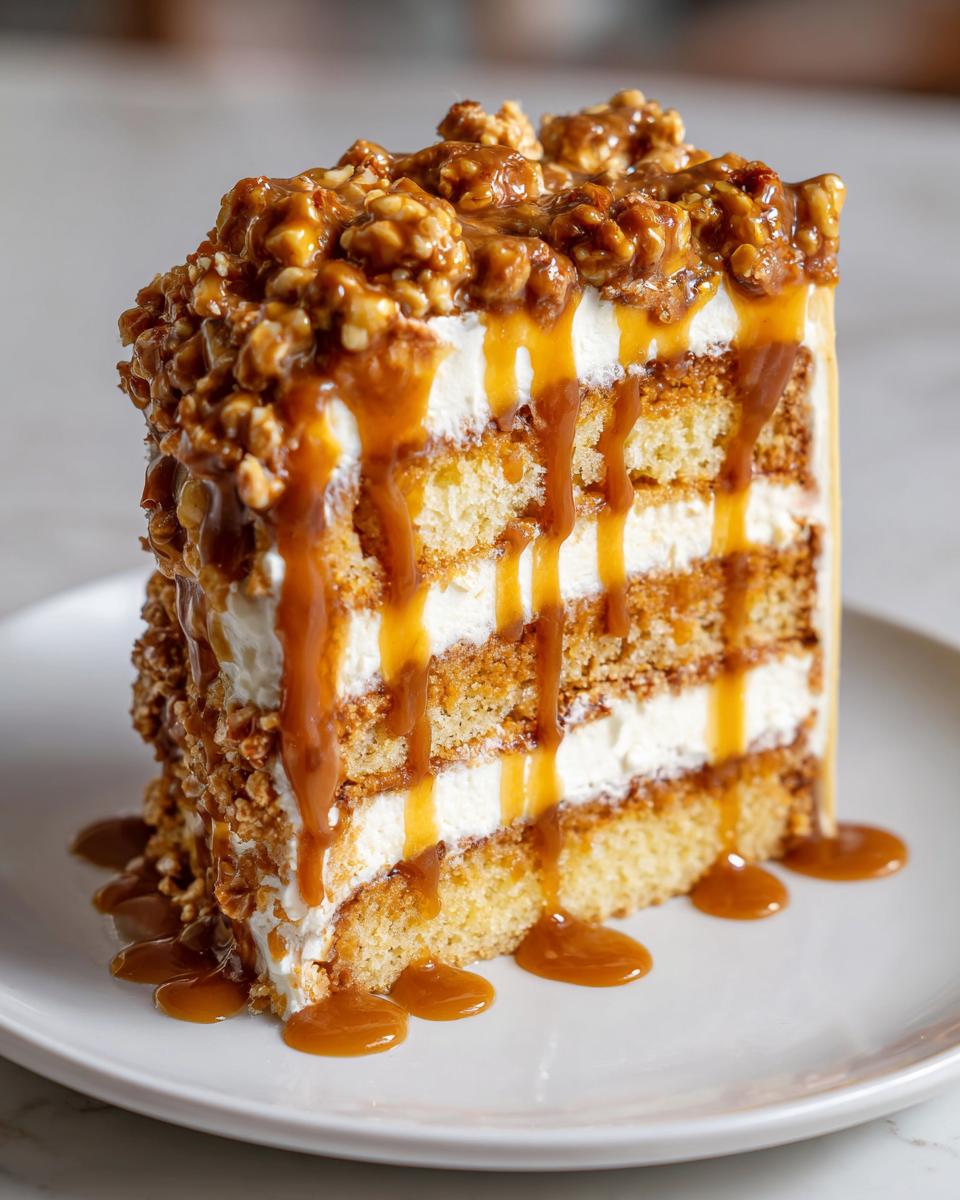
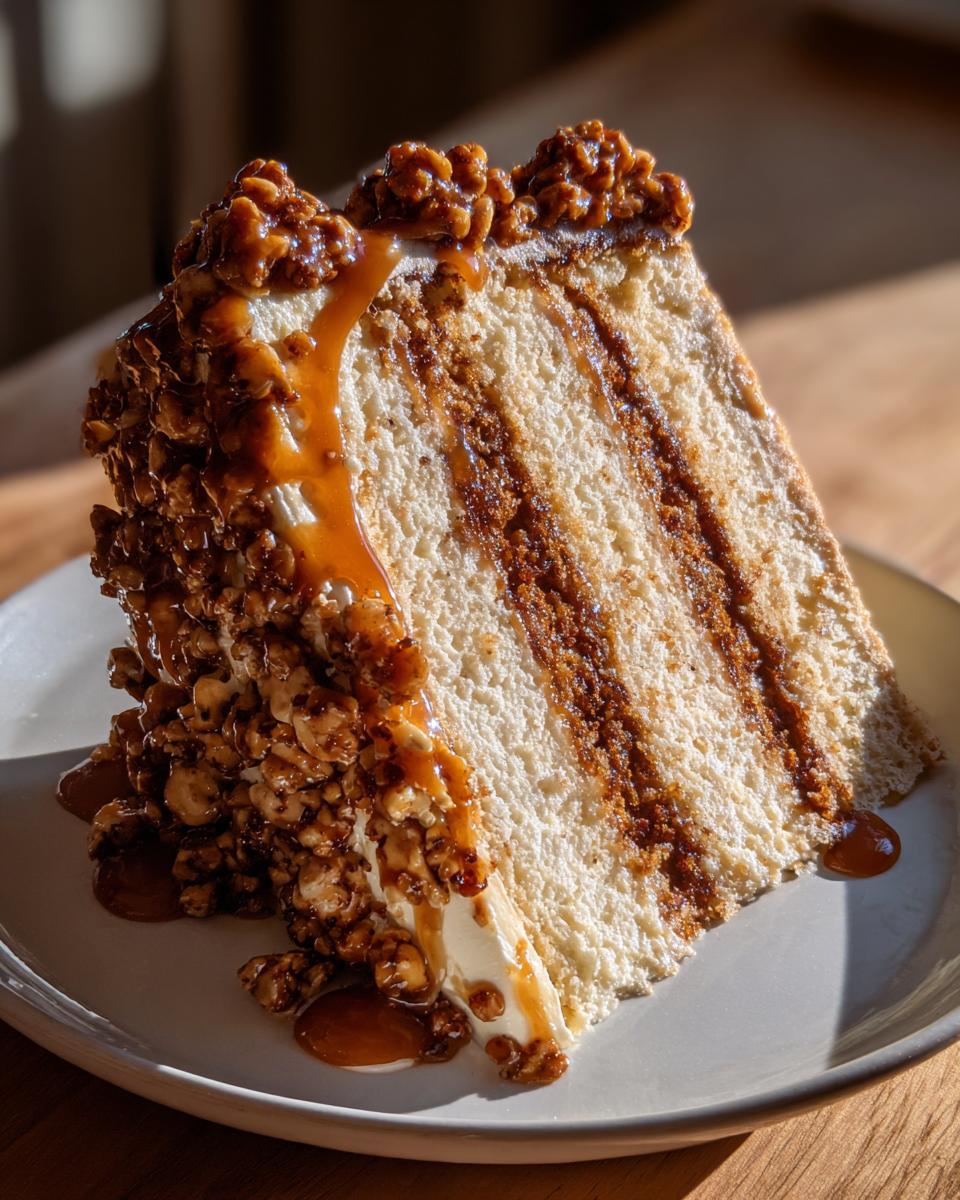
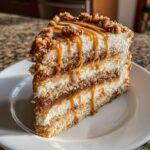
This is the grand finale! Place the first layer down, and cover it generously with frosting. Don’t forget to drizzle a little extra caramel sauce right over that frosting layer. Now, sprinkle half of your crunchy bits—this is where the *crunch* really shines in this Layered Caramel Cake. Top it with the second layer. Use the rest of the frosting to cover the top and the sides smoothly. Finish by drizzling more caramel across the top surface and showering the whole thing with that glorious reserved praline crunch. Make sure you press some of it right into the sides so everyone knows what they are getting!

Tips for Success Making Your Caramel Crunch Cake Recipe
You’ve done the hard work mixing and baking, so let’s make sure these final steps guarantee success for your Caramel Crunch Cake Recipe! The very first rule I preach in my kitchen is patience regarding temperature. You absolutely must ensure those cake layers are rock-solid cool before you even *think* about touching them with frosting; otherwise, you’ll end up with a caramel soup disaster. I learned that the hard way!
Another great tip is focusing on that crunch. For the ultimate texture contrast, try to keep your praline crunch stored in an airtight container completely away from the frosted cake right up until serving time. Humidity is the enemy of crunch, you know? If you skip this one step, you risk losing that spectacular shatter that makes this a truly indulgent cake. For those needing a shortcut, checking out other decadent recipes like the one I saw on Middle East Sector can give you ideas, but trust me, that homemade crunch is worth the extra 15 minutes!
Ingredient Notes and Substitutions for This Crunchy Caramel Dessert
I get so many questions about swapping things out in this Caramel Crunch Cake, and it’s totally normal! Baking is flexible, but we have a few non-negotiables for keeping that pure flavor profile high. If you’re missing something, don’t panic; just try to stick close to the intended texture.
When it comes to our Crunchy Caramel Dessert, the biggest question is always the nuts versus the toffee bits in the praline. If you have a nut allergy, ditch the pecans and grab a good quality bag of Skor or Heath toffee bits instead. They melt perfectly into that homemade caramel base. If you use store-bought toffee, they are already crunchy, so just fold them in gently at the end—no need to cook them down as long!
For the milk, the recipe calls for whole milk, which gives us amazing richness in the cake layers. If you only have 2% on hand, go ahead and use it! I wouldn’t recommend skim, though, because we really rely on the fat content here for that Buttery Cake Recipes feel. If you want to get wild with the caramel sauce? The notes mention substituting 1/4 cup of milk with extra caramel sauce in the actual cake batter. That’s a fantastic way to deepen the flavor if you’re feeling extra brave!
Also, please don’t stress about making the caramel sauce from scratch if you’re short on time. While homemade is always best (check out my tutorial if you need help on that!), using a high-quality, thick store-bought salted caramel sauce for the frosting base will still give you a delicious result. Just remember to taste it first—if your store-bought sauce is sweeter, you might need to bump up that extra salt in the frosting slightly to keep that critical balance!
Serving Suggestions for Your Celebration Cake Ideas
This Caramel Crunch Cake is already such a star, right? Sometimes, you don’t need much to go alongside an absolute showstopper like this! But even the best cakes benefit from a little accompaniment. Since this is ultra-rich, we should balance the flavor profile rather than doubling down on heavy sweetness.
For the perfect accompaniment to these amazing Celebration Cake Ideas, I always suggest pairing a slice with something bright. A fresh black coffee is my personal favorite; the bitterness of the coffee really cleanses your palate between rich bites of the salted caramel frosting.
If you are serving this during the day or just want something slightly lighter, don’t bring out anything too fussy. A small scoop of really good, high-quality vanilla bean ice cream melts just enough to create its own little luxurious pool around the slice. Trust me, the cold creaminess against the crunchy caramel makes you close your eyes in happiness.
Alternatively, a small bowl of tart, slightly acidic fruit, like fresh raspberries or sliced Granny Smith apples, works wonders. It’s amazing how a little burst of fresh tang can reset your taste buds and make you ready for another bite of buttery cake layers!
Storage & Reheating Instructions for Leftover Caramel Crunch Cake
Oh, the eternal problem: having leftover caramel crunch cake! First off, congratulations, because it means you made something truly wonderful. Now, we need to handle the leftovers with care, especially because we have three different textures involved here—the moist cake, the creamy frosting, and the delicate crunch.
If you plan on eating the rest of the cake within a day or two, leaving it out on the counter at cool room temperature is actually my preferred method. Just make sure it’s under a cake dome or very tightly wrapped in plastic wrap. That keeps the cake layers soft, and the buttercream frosting stays perfectly fine for about 48 hours. If you notice the room is warm, though, refrigeration is safer.
When you refrigerate the caramel crunch cake, be warned: the cake layers might firm up a bit. That’s why I always suggest letting individual slices sit out on the counter for at least 30 minutes before serving them again. We want that buttery tenderness back!
But here is my absolute game-changing tip for maintaining that glorious texture contrast? If you have lots left over, take that beautiful praline crunch topping and store it in a separate, completely airtight container at room temperature. When you serve the slice, gently sprinkle the fresh crunch on top, maybe adding a tiny, fresh drizzle of caramel sauce if you have any left. This keeps the crunch from getting soggy against the frosting. Honestly, storing that crunch separately is the secret to resurrecting your caramel crunch cake several days later!
Frequently Asked Questions About Making Caramel Crunch Cake
I know when you look at this stunning bake, you might think, ‘This must be a three-day project!’ But I promise you, we designed this as a showstopper that fits into real life. Let’s clear up any worries you have about tackling this incredible caramel crunch cake!
Can I make the cake layers ahead of time for this Caramel Crunch Cake Recipe?
Yes, you absolutely can! That’s one of the things I love most about a good Caramel Crunch Cake Recipe—it lets you break up the work. You can bake the cake layers entirely, let them cool, and then wrap each one tightly in plastic wrap—twice!—and store them at room temperature for up to two days, or freeze them for up to a month. If you freeze them, just let them thaw overnight on the counter before you attempt to frost them. Remember, cold cake is easier to handle, but we don’t want them frosty when applying that rich frosting.
What is the best way to get a truly crunchy topping?
Moisture is the enemy of crunch, period. To ensure your Homemade Caramel Crunch is perfect, the best strategy is making it the day you plan to assemble the cake, or at least the day before, and storing it in a completely dry, airtight container away from everything. Don’t try to make the praline topping when it’s raining outside or if your kitchen is steamy from boiling water, as humidity will start dissolving that caramel coating instantly! Use parchment paper for cooling, and then break it up and store it dry right up until the moment you need to stick it onto the frosting.
Is this considered an Easy Caramel Cake Baking project?
Well, I wouldn’t call it ‘easy’ in the five-ingredient, 30-minute dinner sense, because we are making three components here—but I absolutely designed it to be straightforward despite its appearance! If you can handle creaming butter and sugar and following simple temperature cues, you can master this. It’s more about careful timing than complicated technique. Think of it as having three simple, small tasks that add up to one magnificent, Decadent Caramel Cake. It’s much easier than it looks, especially since it’s so forgiving!
If you have any other questions before diving in, feel free to check out our privacy policy here, or just drop us a comment below! We want you to succeed!
Share Your Caramel Toffee Delight
Alright, my friend, you’ve made the ultimate Caramel Crunch Cake! You’ve navigated the frosting, you’ve conquered the crunch, and now you have this stunning dessert sitting proudly on your counter. That feeling of accomplishment is why I love baking so much—it’s tangible joy!
Now, I absolutely need to see what you’ve created! Did your praline turn out perfectly brittle? Are those caramel drizzles looking just right? Don’t keep that beauty to yourself!
Please take a picture and tag me when you share it online. I want to celebrate your success! If you want to connect about anything else, or if you have burning questions that popped up while you were baking, don’t hesitate to reach out through our contact page.
And if this recipe brought a smile to your face and a sweet ending to your meal, the best compliment you can give me is leaving stars below. Did you love the texture contrast? Was this the Best Caramel Dessert you’ve ever made? Tell me everything in the comments! We build this kitchen together, one delicious bake at a time.
PrintDecadent Caramel Crunch Layer Cake
Make this indulgent Caramel Crunch Cake featuring moist vanilla layers, rich salted caramel frosting, and a satisfying praline crunch topping. This recipe delivers the texture contrast and flavor you want for any celebration.
- Prep Time: 35 min
- Cook Time: 35 min
- Total Time: 1 hour 45 min
- Yield: 10 servings 1x
- Category: Dessert
- Method: Baking
- Cuisine: American
- Diet: Vegetarian
Ingredients
- 2 cups all-purpose flour
- 1 1/2 teaspoons baking powder
- 1/2 teaspoon salt
- 1 cup unsalted butter, softened
- 1 3/4 cups granulated sugar
- 4 large eggs
- 1 cup whole milk
- 2 teaspoons vanilla extract
- For the Salted Caramel Frosting: 1 cup unsalted butter, softened
- 3 cups powdered sugar
- 1/2 cup homemade salted caramel sauce (plus extra for drizzling)
- 1 teaspoon vanilla extract
- 1/4 teaspoon salt
- For the Praline Crunch: 1 cup granulated sugar
- 1/2 cup chopped pecans or toffee bits
- 2 tablespoons water
Instructions
- Preheat your oven to 350°F (175°C). Grease and flour two 8-inch round cake pans.
- In a medium bowl, whisk together the flour, baking powder, and salt. Set aside.
- In a large bowl, cream the softened butter and granulated sugar until light and fluffy. Beat in the eggs one at a time, mixing well after each addition. Stir in the vanilla extract.
- Gradually add the dry ingredients to the wet ingredients, alternating with the milk, beginning and ending with the flour mixture. Mix until just combined. Do not overmix.
- Divide the batter evenly between the prepared pans. Bake for 30 to 35 minutes, or until a toothpick inserted into the center comes out clean. Let the cakes cool in the pans for 10 minutes before inverting them onto a wire rack to cool completely.
- Prepare the Praline Crunch: In a small saucepan, combine the 1 cup sugar and water. Heat over medium heat without stirring until the sugar dissolves and turns a deep amber color. Remove from heat and quickly stir in the pecans or toffee bits. Pour onto parchment paper and let cool completely, then break into small pieces.
- Prepare the Salted Caramel Frosting: Beat the butter until creamy. Gradually add the powdered sugar, mixing until smooth. Beat in the 1/2 cup salted caramel sauce, vanilla extract, and salt until the frosting is light and spreadable. Add more powdered sugar if too thin, or a teaspoon of milk if too thick.
- Assemble the cake: Place one cake layer on a serving plate. Spread a layer of frosting over the top. Drizzle with a little extra caramel sauce. Top with half of the praline crunch pieces. Place the second cake layer on top. Frost the top and sides of the entire cake with the remaining frosting. Drizzle the top with more caramel sauce and sprinkle generously with the remaining praline crunch.
Notes
- For the best texture contrast, make sure the cake layers are completely cool before frosting.
- You can substitute store-bought toffee bits for the homemade praline crunch if you need a quicker option.
- If you want a deeper caramel flavor in the cake itself, substitute 1/4 cup of the milk with caramel sauce.
Nutrition
- Serving Size: 1 slice
- Calories: 550
- Sugar: 65g
- Sodium: 250mg
- Fat: 30g
- Saturated Fat: 18g
- Unsaturated Fat: 12g
- Trans Fat: 0.5g
- Carbohydrates: 70g
- Fiber: 1g
- Protein: 5g
- Cholesterol: 110mg