
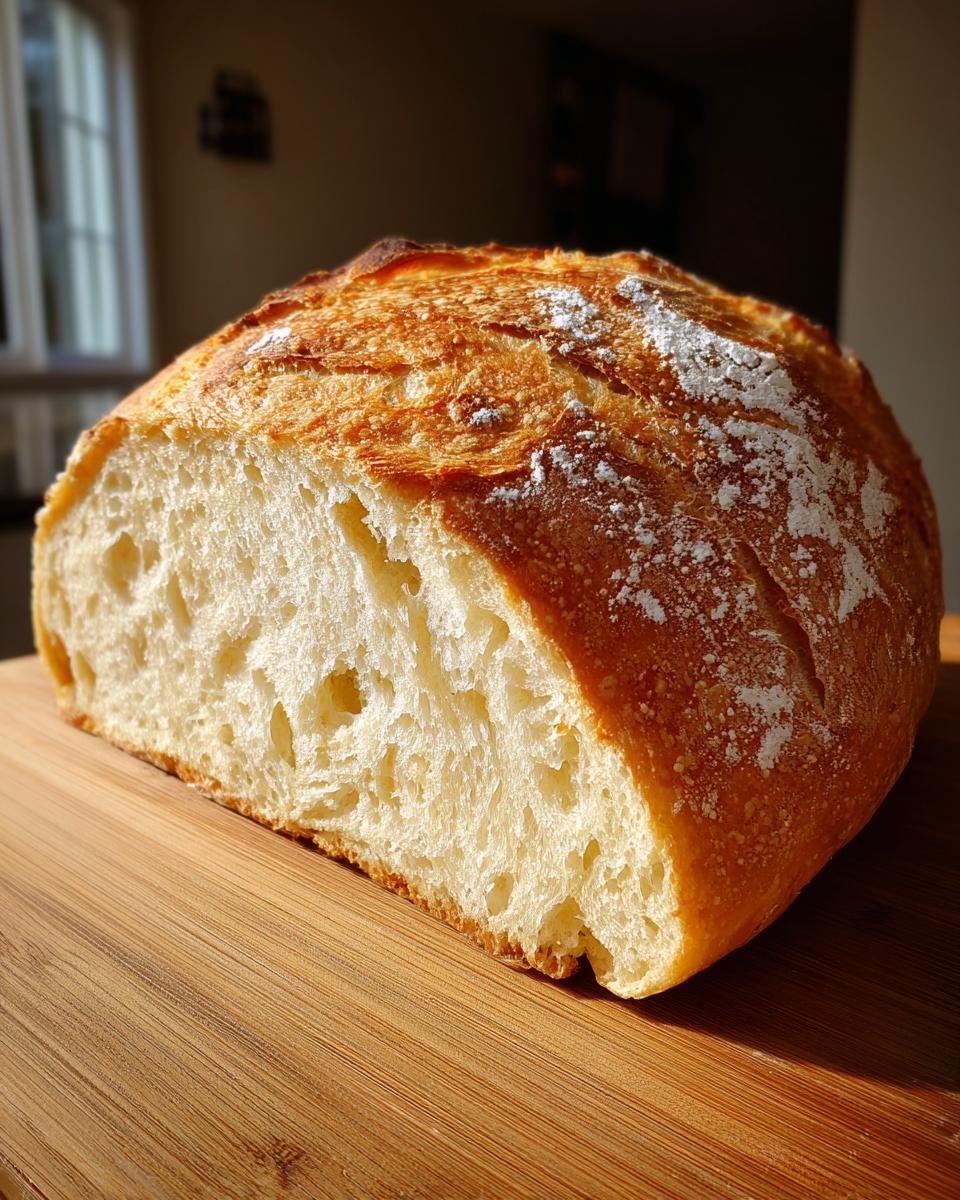
Oh my goodness, there is truly nothing that beats the smell of absolutely fresh, homemade bread filling your entire house, is there? It’s an instant cure for a hard day. That’s precisely why I developed this straightforward French bread recipe. My goal, just like when I was juggling deadlines in my old marketing life, was to find a way to serve that incredible bakery magic without spending half the day waiting around. This formula cuts right to the chase. You get a wonderfully soft, fluffy interior paired with that satisfyingly crisp, crackly exterior, all ready in under two hours. I promise you, this is the honest, accessible recipe your kitchen needs right now to bring connection back to dinnertime.
- Why This Easy French Bread Recipe Belongs in Your Rotation
- Gathering Ingredients for Your Homemade French Bread Recipe
- Step-by-Step Instructions: Make French Bread from Scratch
- Baking Homemade Bread Tips for Beginners
- Ingredient Notes and Substitutions for Your French Bread
- Serving Suggestions for Dinner Side Bread
- Storage and Reheating Instructions for Tender Crumb Bread
- Frequently Asked Questions About Making French Bread
- Nutrition Estimate for This Simple Yeast Bread
Why This Easy French Bread Recipe Belongs in Your Rotation
I know you’re looking for a great homemade French bread recipe that doesn’t take all Saturday to make, and trust me, I get it! My whole philosophy here at Bring Dish is about making real, wonderful food practical for real life. This loaf proves you absolutely can have it all when it comes to texture. You can read a bit more about why I believe in simple, honest recipes right here.
Here’s why you’ll keep coming back to this dough:
- It’s genuinely ready from start to finish in under two hours. That’s basically lightning speed for artisan-style bread!
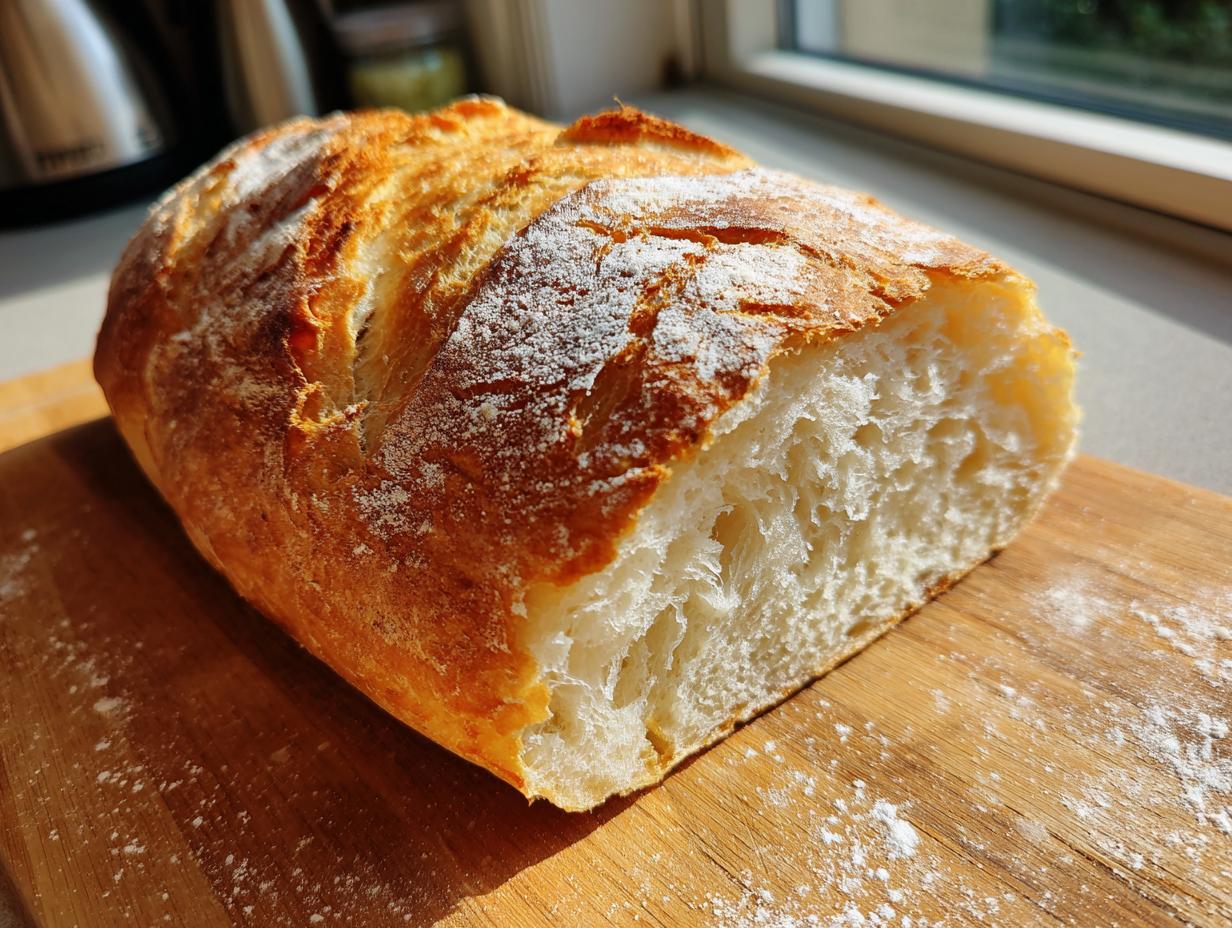
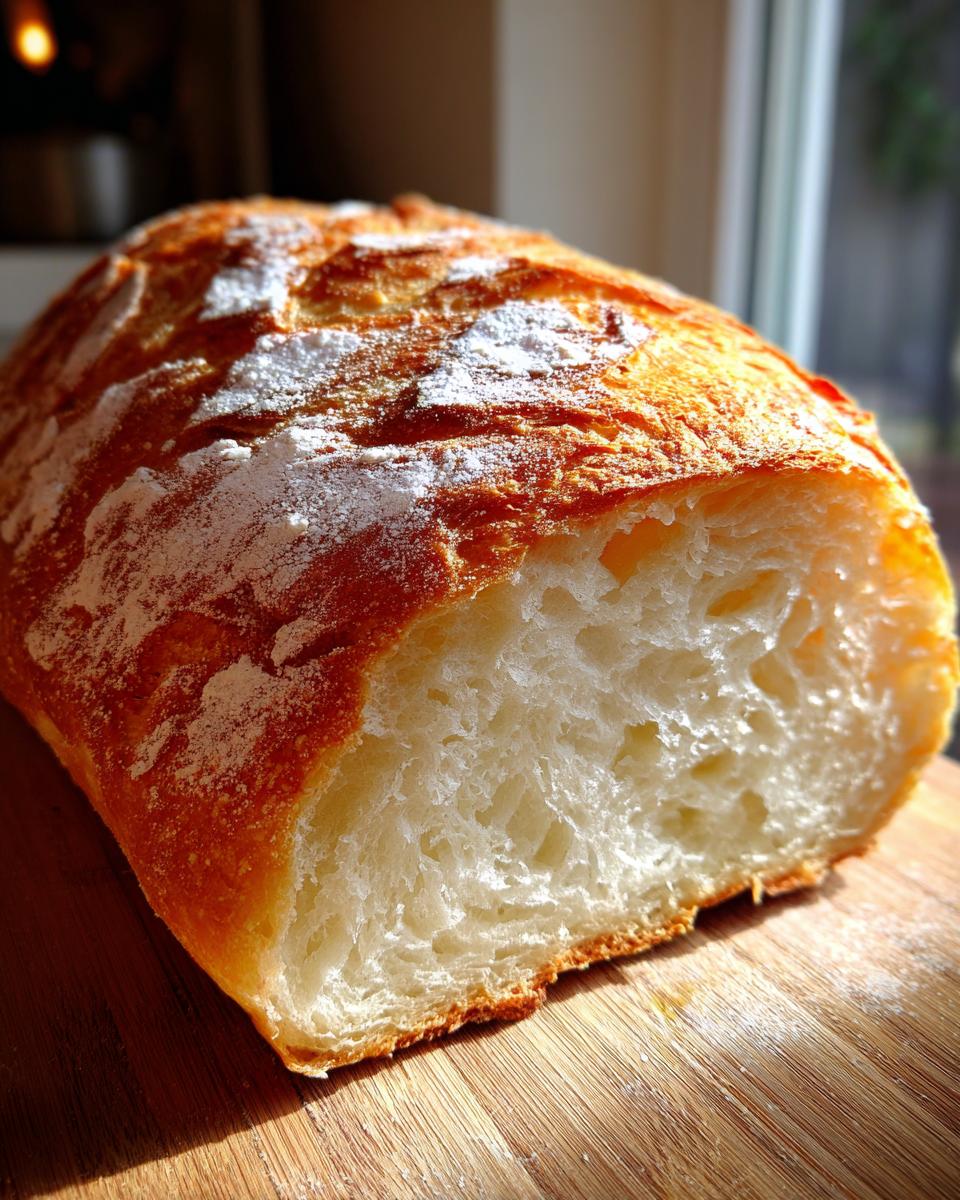
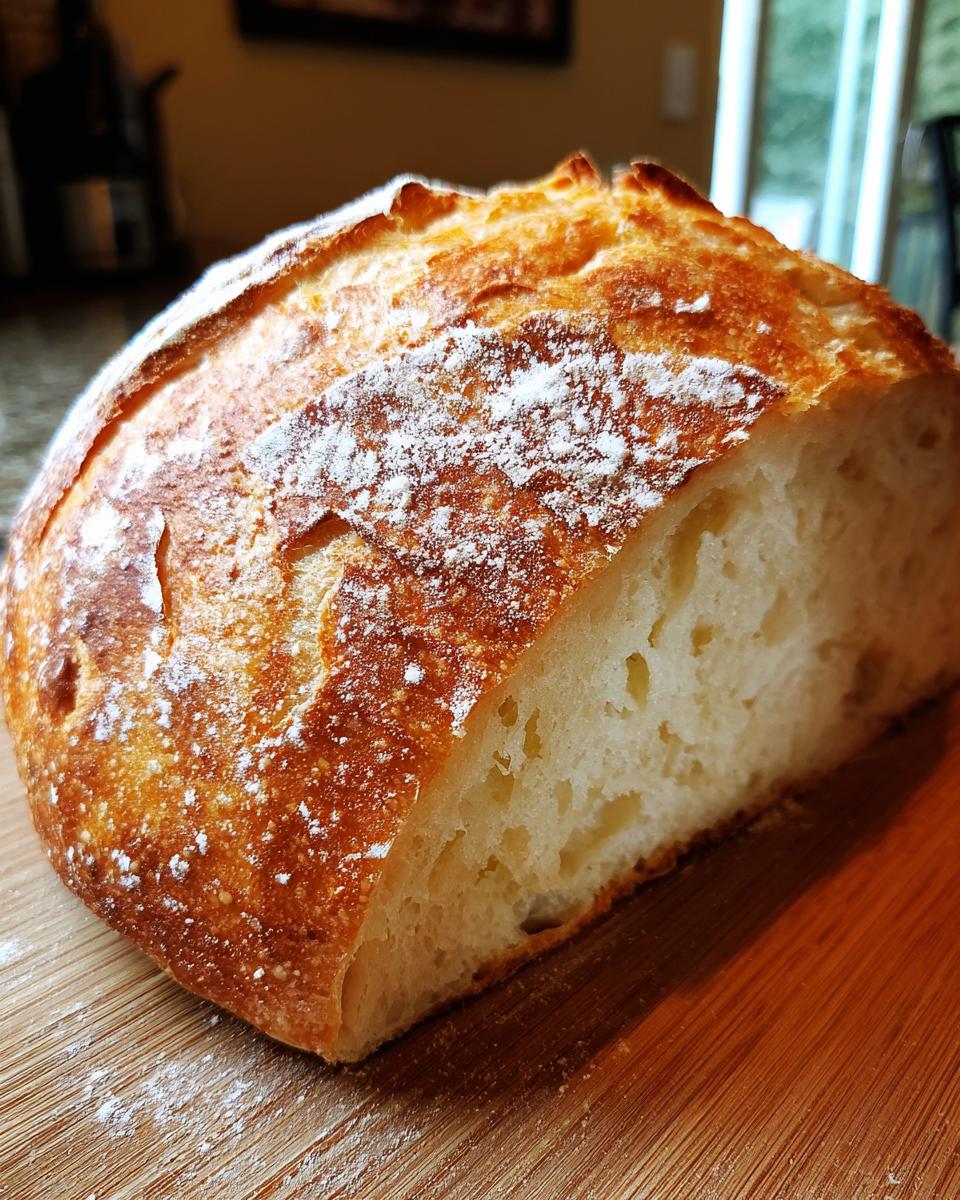
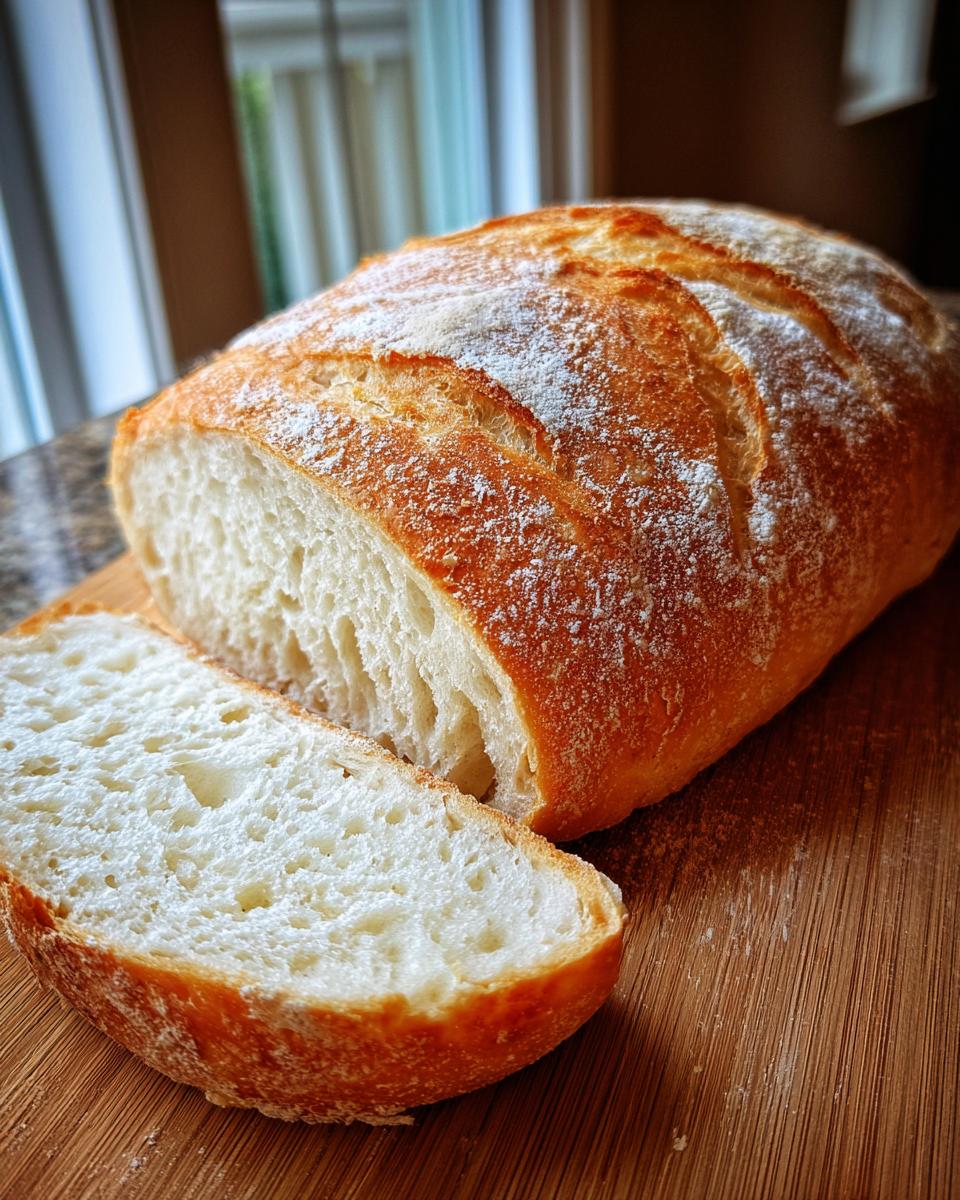
- We nail that ultimate contrast: a cloud-like, tender crumb inside that melts in your mouth.
- The exterior delivers that beautiful, audible crackle—that bakery-style crunch.
Achieving Bakery Style Bread Texture at Home
The secret weapon for that fantastic, crusty exterior bread experience is simple: steam. Yes, steam! It sounds fancy, but it’s just a little pan of hot water in the oven while baking. Don’t worry, I walk you through it exactly in the instructions. It keeps the crust soft enough to expand beautifully but sets it up to be perfectly crunchy when it comes out. It’s the best trick for beginners!
Gathering Ingredients for Your Homemade French Bread Recipe
When it comes to making truly great French bread, I believe in keeping things honest and simple—we aren’t messing around with fancy, hard-to-find supplies here! Every ingredient listed is designed to work hard to give you that perfect result, whether you’re aiming for a sandwich loaf or a dinner side bread.
You need yeast, of course, and we’ll bloom that right away. Make sure your water is nice and warm, aiming for that 105°F to 115°F sweet spot—too cold and the yeast sleeps, too hot and it’s toast! We use all-purpose flour because it gives us the perfect balance of chew and tenderness for this specific loaf. Don’t forget the salt; it controls the rise and adds depth. That little bit of olive oil? That’s what helps keep the final dough workable and contributes to that *tender crumb bread* you’re hoping for.
Step-by-Step Instructions: Make French Bread from Scratch
Okay, this is where the magic happens! Don’t let the steps scare you; they are just clear guidelines to make sure you get that deliciously soft French bread at home. We move quickly, but we respect the yeast’s schedule. I’ve lined up the instructions exactly how I do it every time to get that perfect contrast.
Activating Yeast and Mixing the Dough for Soft French Bread at Home
First things first: we wake up the yeast! Mix your three teaspoons of active dry yeast with the sugar and warm water. You have to wait about five to ten minutes until it gets foamy on top. If it’s bubbly and smells a little earthy, great—that means your yeast is happy and ready to do its job. Now, dump in the flour and salt, plus that splash of olive oil. Mix it up until it becomes a shaggy dough, meaning it’s just hanging out in a messy ball. Don’t worry if it looks a little wild!
Kneading and the First Rise for Fluffy Loaf Recipe
Now we work the gluten, which is what gives us that fantastic texture. Turn that shaggy mess out onto a counter dusted lightly with flour. Knead this stuff for a solid six to eight minutes. You’ll feel the change as you go; it stops sticking and starts feeling smooth and elastic, almost like you are petting a very calm cat. Once it’s smooth, tuck it into a lightly oiled bowl, turning to coast, and cover it up. Let it hang out somewhere warm for about 60 to 75 minutes until it’s doubled. Remember to review our Privacy Policy if you have questions about site usage later!
Shaping and Proofing Your Quick French Bread Recipe
Once the dough has doubled, gently punch that air out—don’t treat it rough, just deflate it a little. Turn it onto your counter and shape it into your desired loaf. Place it on parchment paper, cover it loosely again, and let it rest for just 20 minutes. This final little nap means your quick French bread recipe will continue to puff up nicely in the oven before its hot bath in the oven.
Baking Technique for Crusty Exterior Bread
Time to crank that heat! Preheat your oven to 400°F, and here is the critical step for anyone wanting that crusty artisan bread look: stick a shallow pan on the bottom rack while it heats up. When the oven is ready, score your dough with a few quick diagonal cuts—this controls where the bread bursts open. Then, pour about half a cup of hot water into that preheated pan underneath the bread. That burst of steam creates that beautiful crusty exterior bread experience! Bake for 25 to 30 minutes. You’ll know it’s done when you tap the bottom and it sounds hollow—that means the interior is baked through and wonderfully soft.
Baking Homemade Bread Tips for Beginners
I hear from so many people who think baking homemade bread—especially something like French bread—is just too intimidating. But honestly, once you respect the yeast and the heat, it’s pure ease! The biggest mistake folks make when trying this simple yeast bread is messing with the initial rise conditions. We’ve kept this recipe fast, but we can’t rush the yeast; it’s the engine that gets us that incredible, soft crumb.
Water Temperature Matters for Simple Yeast Bread
You have to treat your yeast like a delicate little thing in the beginning. You know how I mentioned that 105°F to 115°F range for the water? That’s crucial for that initial foamy activation. If the water is too cool, the yeast won’t wake up properly, and your first rise will take forever, resulting in a dense loaf. If it’s too hot, you kill off your yeast buddies, and you’ll end up with a hard, flavorless brick. A good temperature check guarantees you get that desired rise you need for a light loaf. If you want more proofing tips, check out this great resource on getting fluffy results!
Ingredient Notes and Substitutions for Your French Bread
Because this is such a straightforward recipe, the quality of what you put in really shines through! The biggest question I always get is about the flour. We use standard all-purpose flour because it gives us the best result for a loaf that’s sturdy enough to slice but still tender. Please don’t swap that out for bread flour unless you really want something chewier, though this isn’t aiming for that texture! Also, check your yeast before you start! If your yeast is old and doesn’t foam up when you activate it, the entire loaf fails to rise right. Always use active dry yeast that smells fresh for this **Simple Yeast Bread**.
Serving Suggestions for Dinner Side Bread
Once you pull this absolute beauty of a French bread out of the oven, the hardest part is waiting for it to cool! But trust me, slicing into it warm is worth the risk of burning your mouth. This loaf is the ultimate dinner side bread. Forget those sad, plastic-wrapped loaves from the store; you’ve made something special here.
I love slicing it thick and serving it alongside a big, hearty bowl of tomato soup—it’s perfect for dipping! If you’re having an appetizer night, just slice it, drizzle with good quality olive oil, maybe a sprinkle of coarse salt, and you’re done. It’s also my go-to base for a killer meatball sub because that soft interior holds up so well. Before you forget, make sure you look over the Terms of Use sometime. I always recommend checking out other quick bread ideas too, just for inspiration!
Storage and Reheating Instructions for Tender Crumb Bread
We want that perfect soft interior and that crusty exterior bread to last, right? Here’s a little secret my grandma taught me about keeping things fresh: don’t store bread in the fridge! That just makes it go stale faster. For a day or two, keep your French bread wrapped tightly in a brown paper bag, and then pop that bag into a Ziploc bag. This keeps the crust from getting soggy while protecting the soft crumb inside.
If your bread is a day old and needs a revival, don’t just microwave it—that’s a fast track to chewy disaster. Pop the loaf (or slice) directly onto the oven rack for just three to five minutes at about 350°F. That quick blast of dry heat brings the crust right back to life and gently warms the inside. It’s like getting a free trip back to the day you baked it!
Frequently Asked Questions About Making French Bread
I totally get it—when you’re looking at a recipe, you need all your little concerns answered before you dive in! I’ve rounded up the most common questions I get about getting this homemade French bread recipe just right. Feel free to reach out if you contact me and I haven’t answered your specific worry! If you have any other questions, please don’t hesitate to drop me a line via the contact page!
Can I make this a One Hour Bread Recipe?
That’s the dream, right? A true one-hour French bread is out there, but usually, those recipes trade a bit of texture for speed, often requiring higher yeast amounts or intense handling. This particular Quick French Bread Recipe is designed to give you the best rise quality and that ideal texture, which honestly requires that hour-plus for the first rise. If you speed up the rise, you will lose that fluffy interior we love. So, while it’s fast—just under two hours total—I prefer to stick to the clock to guarantee you get a perfect loaf every time.
How do I ensure the crumb is truly soft and fluffy?
It comes down to two things: kneading and baking time! You must knead that dough until it’s genuinely smooth and elastic. If you stop too soon, the crumb will be dense. Secondly, watch your time in the oven. The second you pull the bread out when it sounds hollow, stop! I know it’s tempting to let it get darker for the crust, but that’s when the interior dries out. Sticking to the suggested time keeps that beautiful, Soft French Bread at Home you’re aiming for perfectly tender!
Nutrition Estimate for This Simple Yeast Bread
Now, let’s talk quickly about the numbers side of things. When you’re baking something this wholesome and delicious, you don’t need to stress over the details, but it’s nice to know what you’re enjoying! Remember, because we are making this Simple Yeast Bread from scratch, these figures are just an estimate. They’re based on slicing the whole loaf into about ten servings, but how you slice it definitely impacts the final count. If you want to peek at another wonderful quick recipe, check out this guide for easy 2-hour French bread trials!
Here is the breakdown for one slice, keeping in mind these are general approximations:
- Serving Size: 1 slice
- Calories: 150
- Fat: 1.5g
- Saturated Fat: 0.2g
- Carbohydrates: 30g
- Protein: 4g
- Sodium: 250mg
- Sugar: 0.5g
See? Nothing scary here! It’s mostly simple goodness: flour, water, yeast. This is honest food made for sharing around the dinner table, not something overly complicated. Enjoy every bite of your perfectly baked, tender crumb loaf!
PrintEasy Homemade Soft and Crusty French Bread (Ready in Under 2 Hours)

You can make bakery-style French bread at home with this simple recipe. It yields a loaf with a soft, fluffy interior and a satisfyingly crisp crust, perfect as a dinner side or for sandwiches. This recipe is straightforward for beginners.
- Prep Time: 20 min
- Cook Time: 30 min
- Total Time: 1 hour 50 min
- Yield: 1 large loaf 1x
- Category: Baking
- Method: Baking
- Cuisine: French
- Diet: Vegetarian
Ingredients
- 3 teaspoons active dry yeast
- 1 1/2 cups warm water (about 105-115°F)
- 1 teaspoon granulated sugar
- 3 3/4 cups all-purpose flour, plus more for dusting
- 1 1/2 teaspoons salt
- 1 tablespoon olive oil, plus more for greasing
Instructions
- In a large bowl, dissolve the yeast and sugar in the warm water. Let stand for 5 to 10 minutes until foamy. This activates the yeast.
- Add the flour, salt, and olive oil to the yeast mixture. Mix with a wooden spoon until a shaggy dough forms.
- Turn the dough out onto a lightly floured surface. Knead for 6 to 8 minutes until the dough is smooth and elastic. It should feel soft.
- Lightly grease a large bowl with olive oil. Place the dough in the bowl, turning to coat. Cover the bowl with plastic wrap or a clean kitchen towel.
- Let the dough rise in a warm place for 60 to 75 minutes, or until it has doubled in size. This is your first rise.
- Gently punch down the risen dough. Turn it out onto a lightly floured surface and shape it into a long, even loaf or two smaller loaves.
- Place the shaped loaf(ves) on a baking sheet lined with parchment paper or on a pizza stone. Cover loosely and let rest for 20 minutes. This is your second rise.
- Preheat your oven to 400°F (200°C). Place a shallow pan on the bottom rack while the oven preheats to create steam for a crusty exterior.
- Just before baking, slash the top of the loaf(ves) two or three times diagonally with a sharp knife. Pour about 1/2 cup of hot water into the shallow pan on the bottom rack to create steam.
- Bake for 25 to 30 minutes, or until the crust is deep golden brown and the bread sounds hollow when tapped on the bottom.
- Remove the bread from the oven and let it cool completely on a wire rack before slicing.
Notes
- For an extra crusty exterior, brush the loaf lightly with water halfway through the baking time.
- If you want a softer crust, skip adding water to the hot pan during baking.
- This bread is excellent served warm with butter or used for homemade sandwiches.
Nutrition
- Serving Size: 1 slice
- Calories: 150
- Sugar: 0.5
- Sodium: 250
- Fat: 1.5
- Saturated Fat: 0.2
- Unsaturated Fat: 1.3
- Trans Fat: 0
- Carbohydrates: 30
- Fiber: 1.5
- Protein: 4
- Cholesterol: 0