
If you’ve ever looked at a delicate French éclair and sighed, thinking, “That looks amazing, but who has time for all that fussy pastry work?” then trust me, I totally get it. Sometimes we crave that rich, nostalgic flavor—that creamy vanilla filling and shiny chocolate top—but life just doesn’t pause for tricky baking projects. That’s exactly why I brought this recipe into my own collection of favorite gatherings dishes. The eclair cake is the answer! It gives you all the creamy, decadent satisfaction of that classic pastry without ever turning on your oven. Here at Bring Dish, we believe the best food connects people, and this layered dessert is simple, accessible, and absolutely steals the show at any table. You’ll find this fits perfectly alongside all our other favorite easy layered desserts.
- Why This No Bake Chocolate Eclair Cake is Your New Favorite Dessert
- Gathering Ingredients for Your Ultimate Eclair Cake
- Step-by-Step Instructions to Assemble Your No Bake Eclair Cake
- Tips for Success with Your No Bake Eclair Cake
- Variations on the Classic Chocolate Eclair Cake
- Serving Suggestions for Your Crowd Pleasing Eclair Cake
- Storage and Reheating Instructions for Leftover Eclair Cake
- Frequently Asked Questions About No Oven Desserts and Eclair Cake
- Share Your Perfect Eclair Cake Experience
Why This No Bake Chocolate Eclair Cake is Your New Favorite Dessert
I promise you, this eclair cake moves right to the top of your easy rotation. If you need something impressive that doesn’t need oven space, this is it. We’re talking about one of the best No Bake Cake Recipes out there, designed specifically for when you need Quick Potluck Desserts that taste like you spent hours on them. And hey, since we are making our own simple chocolate glaze, feel free to check out my guide on easy homemade chocolate syrup recipe if you decide to upgrade that topping later on!
Zero Oven Time: The Magic of No Bake Cake Recipes
Seriously, ditch the heat! This recipe is perfect for those steamy summer evenings or when your oven is already packed full of dinner. The main advantage here is skipping the whole stressful choux pastry creation—you know, the one that seems determined to deflate the second you look away. We rely on instant ingredients to do the heavy lifting.
Creamy Texture and Classic Flavors in Every Bite of Eclair Cake
What I love most is the texture. You get these wonderful, soft layers of graham crackers taking up just enough moisture, nestled between the coolest, most velvety vanilla pudding and whipped topping blend. It truly captures that nostalgic filling flavor. These Creamy Pudding Desserts make everyone go back for a second slice.

Gathering Ingredients for Your Ultimate Eclair Cake
Okay, now we move to the fun part: gathering our simple lineup! Since this is a no-bake recipe, the quality and type of ingredients really matter for structure. You need just a handful of things that you likely already have on hand. If you’re looking for other no-fuss desserts using similar staples, you can always check out my collection of Vanilla Pudding Desserts. Here is what you need to track down for this incredible eclair cake:
- 1 (14.4 ounce) package instant vanilla pudding mix
- 3 cups cold milk
- 1 (8 ounce) container frozen whipped topping, thawed
- 2 (11 ounce) boxes graham crackers
- 1 cup semi-sweet chocolate chips
- 1/2 cup milk
- 2 tablespoons butter
Ingredient Notes and Substitution Tips for Eclair Cake
Listen, the instant pudding is non-negotiable here, folks. If you try using the cook-and-serve kind, your cake will just weep pudding all over your plate because it won’t set up firm enough to hold those layers. Trust me on that one; I learned the hard way!
For the whipped topping, use the frozen, whipped kind, thawed but still cold. If you substitute fresh heavy cream we have to whip ourselves, you absolutely need to make sure it’s stabilized or it risks melting into liquid once it meets the pudding. And that butter for the glaze? Bring it to room temperature before you start melting it down with the chocolate chips. It helps everything emulsify smoothly into that gorgeous, shiny topping you see in the pictures.
Step-by-Step Instructions to Assemble Your No Bake Eclair Cake
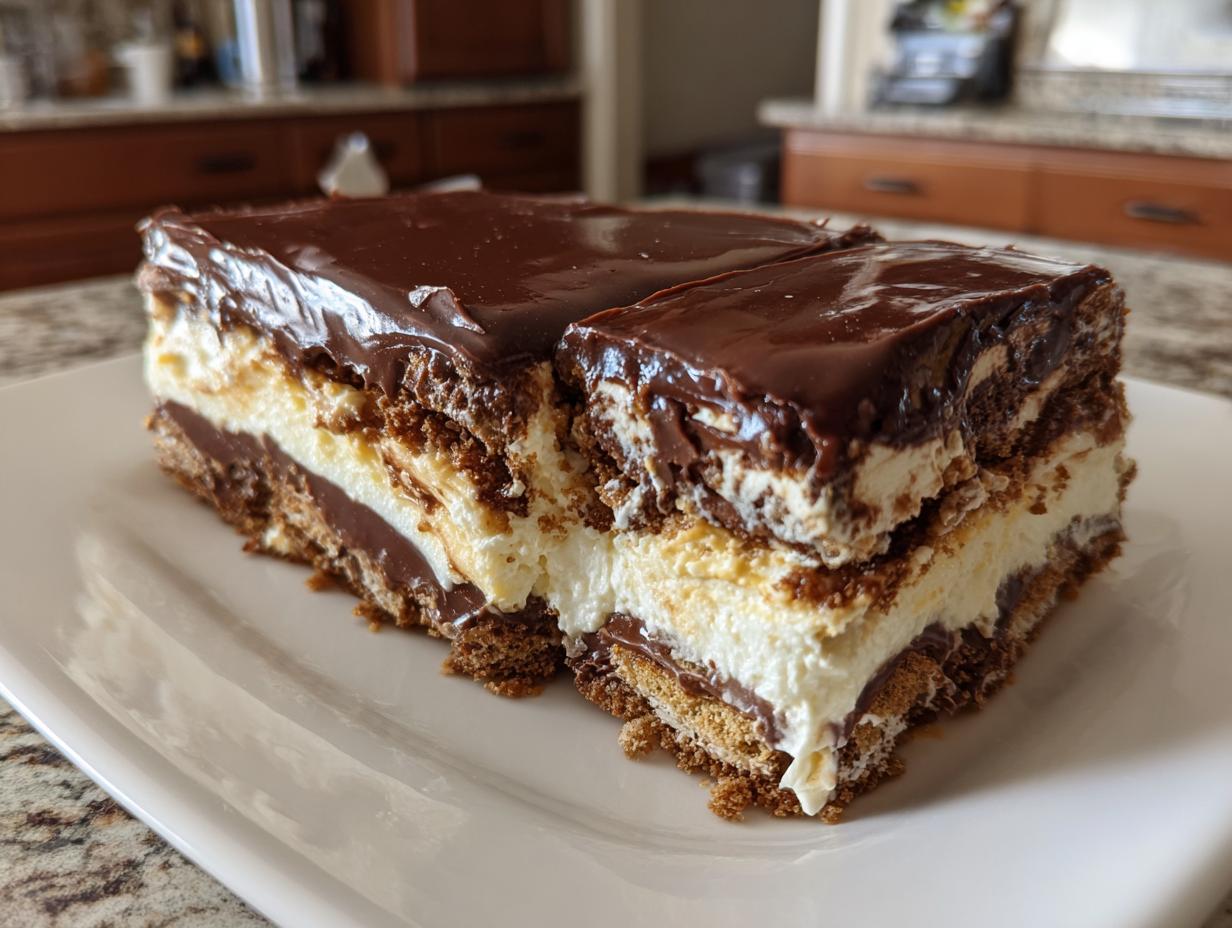
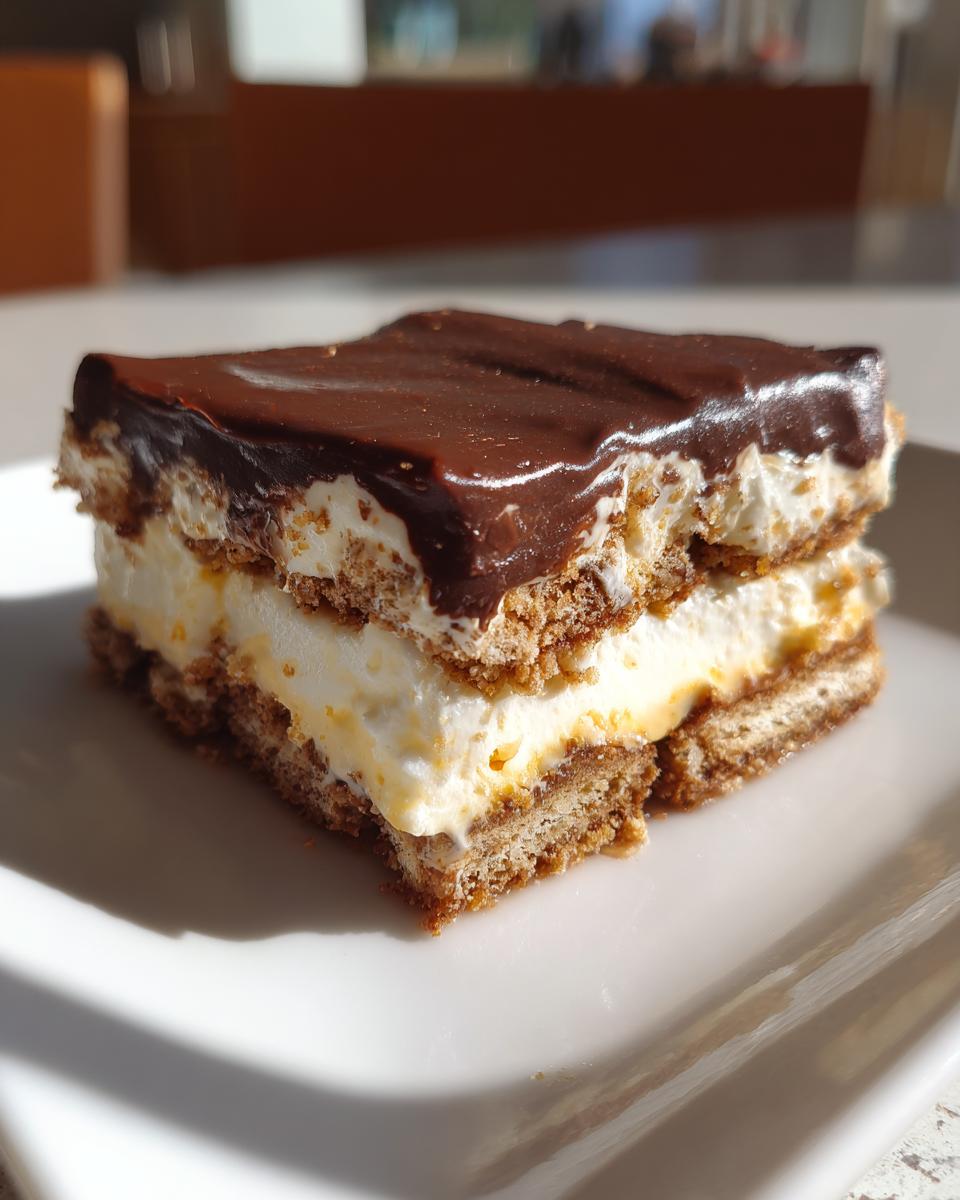
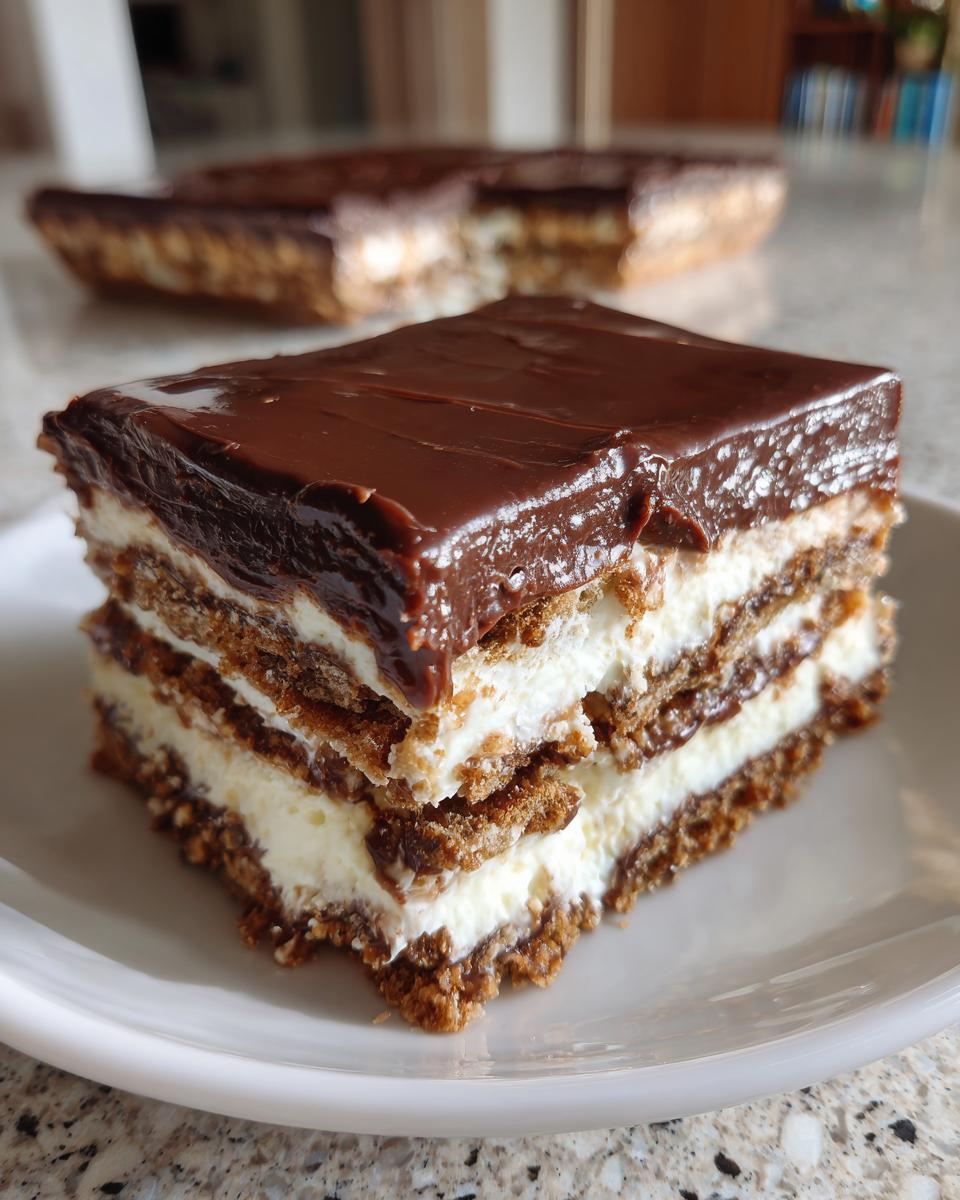
Alright, time to build this beauty! Since this is one of the best Graham Cracker Desserts around, there’s no messy mixing of batter involved, just smart layering. Remember, patience is key here, especially during the chilling phases. If you rush setting time, you end up with dessert soup instead of a beautiful slice! For reference, this works perfectly when assembled in a standard 9×13 inch dish, which gives us plenty of room for those gorgeous layers. If you’re looking for more structure tips, my guide on Icebox Cake Ideas has some great foundational advice.
Preparing the Creamy Vanilla Pudding Filling for the Eclair Cake
First up, we mix that pudding! Get your cold milk and the instant vanilla pudding mix together in a big bowl. Whisk it like you mean it—but don’t go crazy. You only need to whisk until it starts thickening up, which instant mixes do super fast, usually about two minutes. Now, grab your thawed whipped topping. This is crucial: you must gently fold it in using a spatula. We aren’t re-whipping it; we want to keep all those tiny air bubbles in there to make the filling light. Stop folding the second you don’t see any white streaks left.
Layering the Graham Crackers and Pudding Base
Take your graham crackers and line the bottom of that 9×13 pan. Just arrange them edge-to-edge. If you have to break a few pieces to fill the gaps, that’s fine; the pudding will hold them together. Now, gently spread half of your creamy pudding mixture right over the crackers. Make sure you get it smooth right to the edges. Then, you lay down your second layer of crackers right on top of that filling. Finish it off by spreading the last bit of pudding mixture evenly over the top cracker layer. Cover this tightly and get it into the fridge for at least three hours. That chilling time transforms this from mush into solid cake!
Creating the Simple Chocolate Glaze Topping for the Eclair Cake
While the cake is chilling firming up, let’s tackle that top layer! In a small saucepan, combine your chocolate chips, the extra half cup of milk, and the butter. Set the heat to medium. You have to stir this constantly—and I mean *constantly*—until everything melts down into a smooth, liquid masterpiece. If you walk away for even five seconds, you might scorch the chocolate chips on the bottom, and nobody wants crumbly melted chocolate!
Once it’s perfectly smooth, pull it right off the heat. You want the glaze warm when it goes on, but definitely not violently hot. Pour that shiny chocolate blanket right over your chilled pudding base and use an offset spatula to gently spread it out to cover every inch. Back into the cold it goes for one final chill!

Tips for Success with Your No Bake Eclair Cake
Listen, I have learned a few hard lessons making this eclair cake over the years. The most important thing I can tell you is that this dessert *hates* to be rushed. It truly relies on time in the cold to become the spectacular, sliceable dessert it promises to be. If you’re planning a party, you should absolutely treat this as one of your Make Ahead Desserts because the flavor deepens overnight, making the graham crackers perfectly tender.
I remember the very first time I tried making this for a neighborhood barbecue. I was so excited! I only gave it two hours in the fridge because I was running late. Big mistake! When I tried to cut that first piece, the pudding just oozed out everywhere, and the chocolate glaze cracked immediately. It was delicious, sure, but it looked like a puddle! Now I never go below four hours, and honestly, chilling it overnight is the absolute gold standard for structure and taste.
To avoid that cracked glaze—which is so frustrating after all that work—make sure your pudding layer is completely firm before you pour the chocolate on top. If the base is soft, the warm glaze will shift the pudding underneath, causing surface cracks once it cools in the fridge. Also, when you pour the glaze, try to start pouring right in the center and then gently push it outwards toward the edges using a spatula rather than pouring it right up against the sides immediately. This prevents that annoying corner ripple.
If you want to see another fantastic recipe designed for making ahead, check out my collection of make ahead desserts recipes. And if you are looking for different perspectives on no-bake goodness, check out this great resource! This easy eclair cake recipe is another favorite in the community.
Variations on the Classic Chocolate Eclair Cake
While the classic chocolate version is definitely my ride-or-die, half the fun of a great eclair cake is knowing you can tweak the flavor profile to fit the season or whatever you’re craving! Since we’re using instant pudding mixes, switching things up is practically effortless. You don’t have to worry about complex new bases; just swap the flavor cartridge, so to speak. If you’re enjoying this recipe and want to see how berries play with creamy shortcake, you should definitely browse my classic strawberry shortcake recipe ideas too!
Making a Bright Lemon Eclair Cake
If you’re looking for something to cut through the richness, especially in the summer, swapping to lemon is a game-changer. It’s so refreshing! Here’s the deal: just replace that instant vanilla pudding mix with the exact same size package of instant lemon pudding mix. Use the same amount of cold milk, and follow the layering instructions exactly as written. Voila, instant sunshine!
For the glaze, you have two great options. If you want a slightly tart, thin glaze, stick to the original recipe but replace the chocolate chips with white chocolate chips. You’ll skip the cocoa flavor entirely. Then, once the white chocolate is melted with the butter and milk, stir in the zest of one whole fresh lemon. It’s unbelievable how bright that makes the whole thing.
If you want a more substantial topping, use the base vanilla pudding layer but skip the chocolate glaze entirely. Instead, when you fold in the whipped topping, fold in about a cup of thawed frozen whipped topping that has been lightly sweetened with a tablespoon of powdered sugar and a teaspoon of lemon extract. That mimics the filling of a lemon cream pie layered with chocolate wafers instead of graham crackers if you want to make that swap too! For another incredible summertime twist, I saw someone make a gorgeous version over here—check out this strawberry eclair cake if you’re feeling fruity!
Serving Suggestions for Your Crowd Pleasing Eclair Cake
The best part about making something this reliably delicious is that it truly shines as a centerpiece for any gathering. This eclair cake is automatically Crowd Pleasing Party Food because it feeds so many people easily and everyone loves that familiar, sweet combination. When you’re planning your menu, think about what balances out the richness of the pudding and chocolate glaze.
Since this is a wonderfully Make Ahead Dessert, it frees you up on the day of the actual event to focus on everything else. When it comes to presenting it, keep slicing simple. Don’t try to use a delicate knife; use a large, sharp chef’s knife, wiping the blade clean between slices. This helps keep that chocolate topping looking nice and glossy on the plate instead of dragging across the surface.
For beverages, I always try to serve something bright or bubbly to cut through the sweetness. If you’re hosting a big event and need a fantastic, non-alcoholic star, you have to whip up a pitcher of my easy champagne punch recipe. It looks festive, it’s light, and honestly, it pairs beautifully with anything creamy like this cake. You can find all the details on that easy champagne punch recipe for a crowd right here on the site!
If you have anyone who wants a little extra topping on their plate, keep a small bowl of fresh raspberries or sliced strawberries nearby. The slight tartness of the fruit is incredible alongside the vanilla pudding layer. And seriously, if you need ideas for other easy-to-serve mains or sides for your party, I always suggest looking at how others handle their Entertaining Desserts; here’s a fun example of another great potluck dish! Check out how this easy recipe keeps things simple!
Storage and Reheating Instructions for Leftover Eclair Cake
Because this beautiful eclair cake relies on those wonderfully creamy layers of pudding and whipped topping, storage is pretty straightforward, but you absolutely must keep it cold. This is a dairy-heavy dessert, which means we treat it like leftovers from a picnic: straight into the fridge it goes!
I always cover my 9×13 dish tightly with plastic wrap before sliding it in. Try to minimize how much air touches the chocolate glaze; if you wrap it too tightly and it presses onto the chocolate, the glaze might stick to the plastic and pull away when you try to unwrap it later—oops! You want to keep the wrap just above the surface if you can, or just loosely cover the whole dish.
When it comes to leftovers, this cake is wonderfully stable. It usually holds up beautifully for a good three to four days tucked away in the refrigerator. Honestly, though, I’ve never had any last that long! Because the graham crackers absorb moisture from the pudding over time, the texture actually improves a bit the next day, which is why I always advocate making this as a Make Ahead Dessert.
Now, let’s talk about reheating—and this is important: Don’t. Ever. Reheat an eclair cake! If you warm up instant pudding and whipped topping, you are just going to end up with a sloppy, soupy mess that has zero structural integrity. We want that cool, refreshing mouthfeel that makes it taste like a traditional éclair filling. So, if you have extras, just keep them cold. They are meant to be served right from the fridge, still chilled through, maybe even slightly firmer than when you first cut into it.
If you need dessert ideas that hold up well for extended periods or can handle being transported without worry, you might want to browse through my other tips on make ahead desserts for future reference. But for this creamy dream, cold is the only way to go!
Frequently Asked Questions About No Oven Desserts and Eclair Cake
I know when you try a new recipe, especially one of my favorites like this eclair cake, you might have a few doubts pop up! Before you rush off, let me tackle some of the questions I get most often about this easy, no-bake treat. We want to make sure your layers stay perfect and your topping stays glossy!
Can I use chocolate wafer cookies instead of graham crackers in this eclair cake?
That’s a fun idea if you want to lean heavier into that chocolate flavor! Yes, you totally can swap them out. Just know that the texture will change quite a bit when you use the chocolate wafers. Graham crackers are designed to absorb just enough moisture from the pudding to become tender but still offer a little structure. Chocolate wafers, being smaller and often thinner, will get softer, faster. You might find that they completely dissolve into the pudding layer, turning the base layer less distinct layer and more like a fudgy crust. For that classic, clean layered look associated with these Graham Cracker Desserts, I stick to the original, but if you prefer softer structure, give the wafers a try!
How long does the eclair cake need to chill before serving?
This is the make-or-break step, seriously! You need a minimum of three hours chilling time before you even attempt to pour on the glaze. That initial chill is what sets up the pudding layer so it can support the weight of the crackers and the final cool-down. However, if you are aiming for the easiest serving experience and the absolute best flavor, you have to let it sit overnight—at least 8 hours. When that cake is perfectly set, the slices come out clean, you get beautiful height, and the crackers have softened just enough to mimic that lovely pastry texture without falling apart. Don’t be tempted to speed this up by putting it in the freezer; that can sometimes crystallize the pudding in weird ways!
What is the best way to get a smooth, non-cracked Simple Chocolate Glaze Cake topping?
Ah, the glossy top! That’s where a lot of people get stressed out when making a Simple Chocolate Glaze Cake topping. The key, which I learned the hard way, is the temperature differential. You need the base layer to be icy cold—meaning it’s been in the fridge for those minimum three hours—and you need the chocolate glaze to be warm, but *not* hot.
If the glaze is too hot, it melts down into the pudding layer, making everything mushy, and when it sets, it pulls the soft pudding with it, causing cracks. If the glaze is too cool when you pour it, it will immediately seize up on contact with the cold pudding, creating thick streaks that are hard to spread without tearing the surface. Aim for the consistency of thick, warm gravy when you pour it across the cold surface. A gentle pour right in the center, followed by a slow, methodical spread to the edges using a rubber spatula, always gives me that perfect, shiny finish!
Share Your Perfect Eclair Cake Experience
Now that you have all the secrets to making this incredibly easy and impressive eclair cake, I genuinely want to know how it turned out at your table! Did the chocolate glaze set up perfectly? Did your family devour it before you could save a slice for later? That connection—sharing the food we make with love—is exactly why I started this whole thing.
We built this recipe to be one of those Classic Dessert Recipes that you pull out time and time again because it’s just that reliable and delicious. Don’t keep that success all to yourself!
I’d be so thrilled if you dropped by the comments below the recipe card and left me a rating. Seeing those little stars lets me know this dish is holding strong in your rotation, too. If you made any fun swaps or served it at a big event, please share your stories! Connecting over these simple, honest meals is what Bring Dish is all about. If you are always looking for tried-and-true favorites, check out my full list of Classic Dessert Recipes! Happy assembling!
PrintUltimate No-Bake Chocolate Eclair Cake

Make this easy, creamy No-Bake Chocolate Eclair Cake for your next gathering. It layers graham crackers, vanilla pudding, and whipped topping, finishing with a rich chocolate glaze. It tastes like a classic éclair without any baking.
- Prep Time: 20 min
- Cook Time: 5 min
- Total Time: 3 hours 25 min
- Yield: 12 servings 1x
- Category: Dessert
- Method: No Bake
- Cuisine: American
- Diet: Vegetarian
Ingredients
- 1 (14.4 ounce) package instant vanilla pudding mix
- 3 cups cold milk
- 1 (8 ounce) container frozen whipped topping, thawed
- 2 (11 ounce) boxes graham crackers
- 1 cup semi-sweet chocolate chips
- 1/2 cup milk
- 2 tablespoons butter
Instructions
- Prepare the pudding: In a large bowl, whisk together the instant vanilla pudding mix and 3 cups of cold milk until the mixture thickens, about 2 minutes. Gently fold in the thawed whipped topping until just combined.
- Assemble the first layer: Arrange one layer of graham crackers in the bottom of a 9×13 inch baking dish. You may need to break some crackers to fit the bottom evenly.
- Add the filling: Spread half of the pudding mixture evenly over the graham cracker layer.
- Add the second layer: Top the pudding layer with a second layer of graham crackers. Spread the remaining half of the pudding mixture over this layer.
- Chill: Cover the dish and refrigerate for at least 3 hours, or until the pudding is firm. This chilling time is important for structure.
- Make the chocolate glaze: In a small saucepan over medium heat, combine the chocolate chips, 1/2 cup milk, and butter. Stir constantly until the chocolate is completely melted and the mixture is smooth. Remove from heat.
- Top the cake: Pour the warm chocolate glaze evenly over the chilled pudding layer. Spread it quickly to cover the entire surface.
- Final chill: Return the cake to the refrigerator and chill for at least 1 more hour before slicing and serving.
Notes
- You can make this entire dessert ahead of time; it tastes best after chilling overnight.
- For a slightly firmer texture, use regular vanilla pudding mix instead of instant, but adjust the chilling time as needed for setting.
- If you want a fudgier topping, add 1 teaspoon of vanilla extract to the melted chocolate mixture before pouring.
Nutrition
- Serving Size: 1 slice
- Calories: 350
- Sugar: 35g
- Sodium: 320mg
- Fat: 16g
- Saturated Fat: 8g
- Unsaturated Fat: 8g
- Trans Fat: 0g
- Carbohydrates: 50g
- Fiber: 1g
- Protein: 5g
- Cholesterol: 15mg